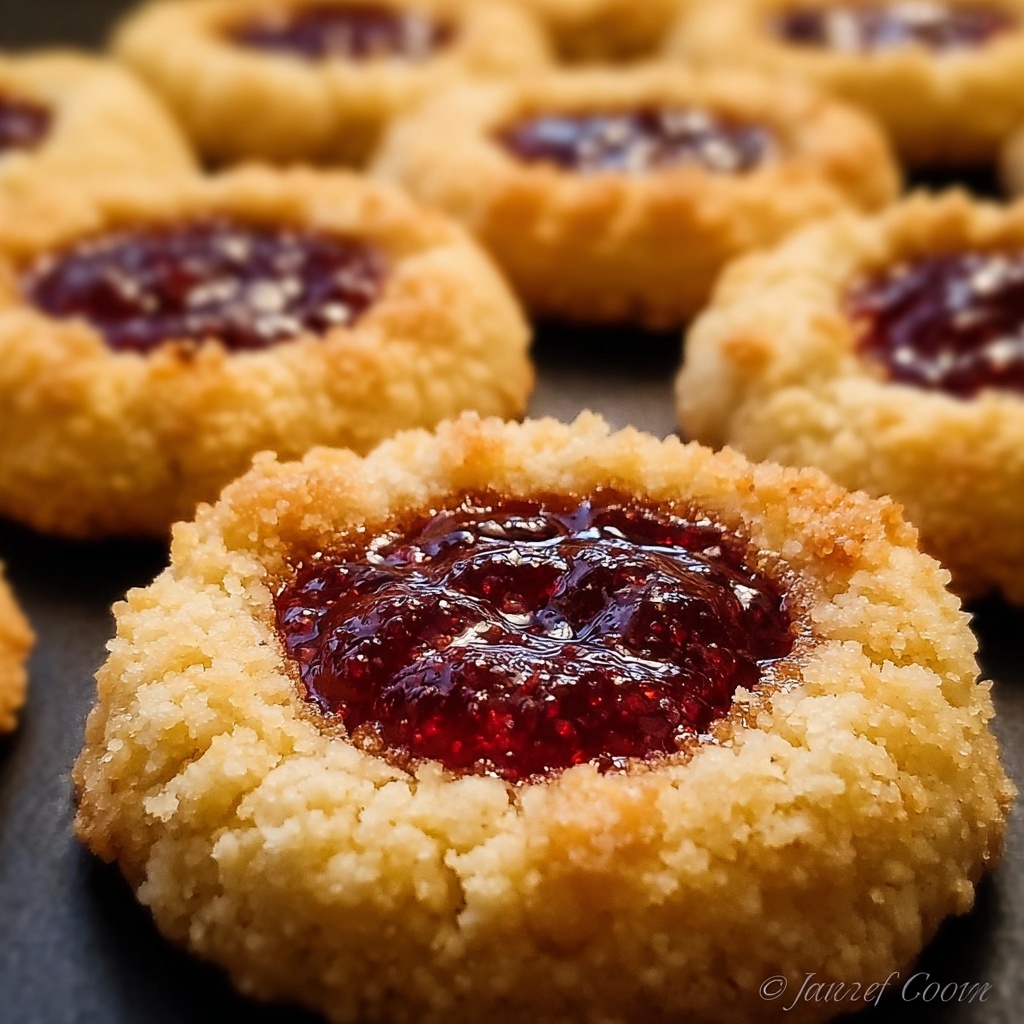
If you’re on the hunt for a charming treat that combines buttery, tender cookies with sweet, gooey centers, this Thumbprint Cookie Recipe is exactly what you need. Each bite offers a delightful dance between a soft, rich base and the vibrant burst of jam or chocolate nestled right in the middle. Perfect for sharing with friends or keeping all to yourself, these cookies bring a nostalgic, homemade charm that’s both simple to make and irresistibly delicious.

Ingredients You’ll Need
The magic behind this Thumbprint Cookie Recipe lies in its straightforward ingredients. Each one plays a crucial role in delivering that perfect texture and balanced sweetness that makes these cookies so special.
- 2 cups all-purpose flour (240 g): The foundation of the cookie, providing structure and a tender crumb.
- 1 cup unsalted butter, softened (226 g): Adds richness and helps create that melt-in-your-mouth texture.
- 1/2 cup granulated sugar (100 g): Sweetens the dough with a clean, classic flavor.
- 1/2 cup brown sugar, packed (100 g): Brings moisture and a subtle caramel note for extra depth.
- 1 teaspoon vanilla extract (5 ml): Infuses warm, aromatic notes enhancing the overall taste.
- 1/4 teaspoon salt (1.5 g): Balances sweetness and intensifies flavors.
- 2 large egg yolks: Add richness and help bind the dough with a silky smoothness.
- 1/2 cup jam or chocolate: The heart of the cookie—choose your favorite flavor to fill each thumbprint indentation.
How to Make Thumbprint Cookie Recipe
Step 1: Preheat and Prepare Your Baking Sheet
Start by heating your oven to 350°F (175°C). Line your baking sheet with parchment paper to ensure the cookies don’t stick and come off effortlessly once baked. This small step makes cleanup a breeze and keeps your cookies in perfect shape.
Step 2: Cream Butter and Sugars
In a large mixing bowl, beat the softened butter together with the granulated and brown sugars until the mixture is light and fluffy. This process introduces air, ensuring your cookies turn out tender and not dense. It’s the secret behind that lovely texture you’ll love.
Step 3: Add Egg Yolks and Vanilla
Mix in the egg yolks and vanilla extract until fully combined. These ingredients bring richness and fragrance to the dough, making every bite burst with flavor.
Step 4: Shape the Dough Balls
Using about 1 tablespoon of dough, roll it gently into balls and place them about 2 inches apart on your baking sheet. Giving them room ensures they bake evenly without merging into each other.
Step 5: Create the Thumbprint Indentation
Press your thumb or the back of a spoon into the center of each dough ball to make a small well. This indentation will hold the jam or chocolate, giving these cookies their iconic look and delightful surprise inside.
Step 6: Fill with Jam or Chocolate
Spoon roughly 1/2 teaspoon of your chosen filling into each indentation. The filling adds sweetness and moisture, creating a gorgeous contrast with the buttery cookie surrounding it.
Step 7: Bake to Perfection
Bake your thumbprint cookies for 12 to 15 minutes or until the edges turn lightly golden brown. The aroma filling your kitchen at this point is absolutely irresistible!
Step 8: Cool Before Enjoying
Let the cookies rest on the baking sheet for about 5 minutes before transferring them to a wire rack to cool completely. This helps them firm up just enough while keeping the filling nice and soft.
How to Serve Thumbprint Cookie Recipe
Garnishes
A simple dusting of powdered sugar over your thumbprint cookies gives them an elegant, festive touch. For an extra wow factor, try drizzling melted white chocolate or sprinkling finely chopped nuts for texture and a hint of crunch.
Side Dishes
These cookies pair beautifully with a cup of hot tea or a frothy latte. For a special occasion, serve alongside fresh berries or a dollop of whipped cream to complement their fruity or chocolatey centers.
Creative Ways to Present
Make your Thumbprint Cookie Recipe truly stand out by arranging the cookies in a colorful pattern on a pretty platter. Gift them in a decorated tin or jar as a lovely homemade present that’s sure to impress anyone lucky enough to receive it.
Make Ahead and Storage
Storing Leftovers
Once cooled, store your thumbprint cookies in an airtight container at room temperature. They stay fresh and delicious for up to a week, making them perfect for baking ahead of time.
Freezing
If you want to keep these treats longer, freeze them in a single layer on a baking sheet first, then transfer to a freezer-safe container or bag. This method prevents them from sticking together and preserves their texture for up to three months.
Reheating
To enjoy your frozen thumbprint cookies, let them thaw at room temperature, or warm them gently in a 300°F oven for 5 minutes. This helps refresh their buttery softness and revives that luscious filling without drying them out.
FAQs
Can I use different types of jam for the Thumbprint Cookie Recipe?
Absolutely! One of the best parts of this Thumbprint Cookie Recipe is its versatility. Feel free to experiment with strawberry, raspberry, apricot, or even fig jam to suit your taste and the season.
Is it necessary to use egg yolks only?
Egg yolks contribute to the rich, tender texture of these cookies, but you can try whole eggs if needed. Just be aware that this might slightly alter the dough’s consistency and the final texture.
Can I substitute butter with margarine or oil?
Butter is key for flavor and texture in this recipe. Margarine or oil can be used in a pinch, but the cookies might not be as rich or firm. For best results, stick with unsalted butter.
How do I prevent the jam from leaking during baking?
Make sure not to overfill the indentations and use thicker jams or preserves. If using chocolate, slightly melted but not too runny chocolate works best to keep everything neatly in place.
Can I make these cookies gluten-free?
Yes, you can try using a 1:1 gluten-free baking flour blend. Just note that texture might vary slightly, so experimenting with binders like xanthan gum might yield the best results.
Final Thoughts
There’s something heartwarming about making and sharing this Thumbprint Cookie Recipe that goes beyond just the delicious taste. Whether you’re baking for a holiday, a special occasion, or simply because you want to treat yourself, these cookies never disappoint. Dive in, have fun with the fillings, and enjoy every buttery, jammy bite!
Print
Thumbprint Cookie Recipe
- Prep Time: 15 minutes
- Cook Time: 15 minutes
- Total Time: 30 minutes
- Yield: 24 cookies
- Category: Dessert
- Method: Baking
- Cuisine: American
Description
Delightful thumbprint cookies featuring a buttery, tender dough filled with your choice of jam or melted chocolate. These classic cookies are perfect for any occasion, offering a sweet, fruity center encased in a golden, soft cookie base.
Ingredients
Cookie Dough
- 2 cups all-purpose flour (240 g)
- 1 cup unsalted butter, softened (226 g)
- 1/2 cup granulated sugar (100 g)
- 1/2 cup brown sugar, packed (100 g)
- 1 teaspoon vanilla extract (5 ml)
- 1/4 teaspoon salt (1.5 g)
- 2 large egg yolks
Filling
- 1/2 cup jam or chocolate (any flavor)
Instructions
- Preheat Oven: Preheat your oven to 350°F (175°C) and line a baking sheet with parchment paper to prevent sticking and ensure even baking.
- Mix Butter and Sugars: In a large mixing bowl, combine the softened butter, granulated sugar, and brown sugar. Beat the mixture until it becomes light and fluffy, creating a smooth base for the dough.
- Add Egg Yolks and Vanilla: Incorporate the egg yolks and vanilla extract into the butter-sugar mixture, mixing well until fully combined to create a rich, flavorful dough.
- Shape Dough Balls: Scoop about 1 tablespoon of dough at a time, roll each into a smooth ball, and place them on the prepared baking sheet. Space the dough balls about 2 inches apart to allow for spreading during baking.
- Create Indentations: Using your thumb or the back of a spoon, gently press an indentation into the center of each dough ball, forming a small well to hold the filling.
- Fill with Jam or Chocolate: Spoon approximately 1/2 teaspoon of your chosen jam or melted chocolate into each indentation, ensuring the filling stays centered.
- Bake Cookies: Place the baking sheet in the preheated oven and bake the cookies for 12-15 minutes, or until the edges turn lightly golden brown, indicating they are done.
- Cool: After baking, allow the cookies to cool on the baking sheet for 5 minutes to firm up, then transfer them to a wire rack to cool completely.
Notes
- You can substitute the jam with chocolate chips or a caramel filling for a different flavor.
- Chilling the dough for 30 minutes before shaping can help prevent excessive spreading.
- Ensure your butter is softened, not melted, for the best texture.
- Store cookies in an airtight container at room temperature for up to 5 days.
- Try using raspberry, strawberry, or apricot jam for classic combinations.


