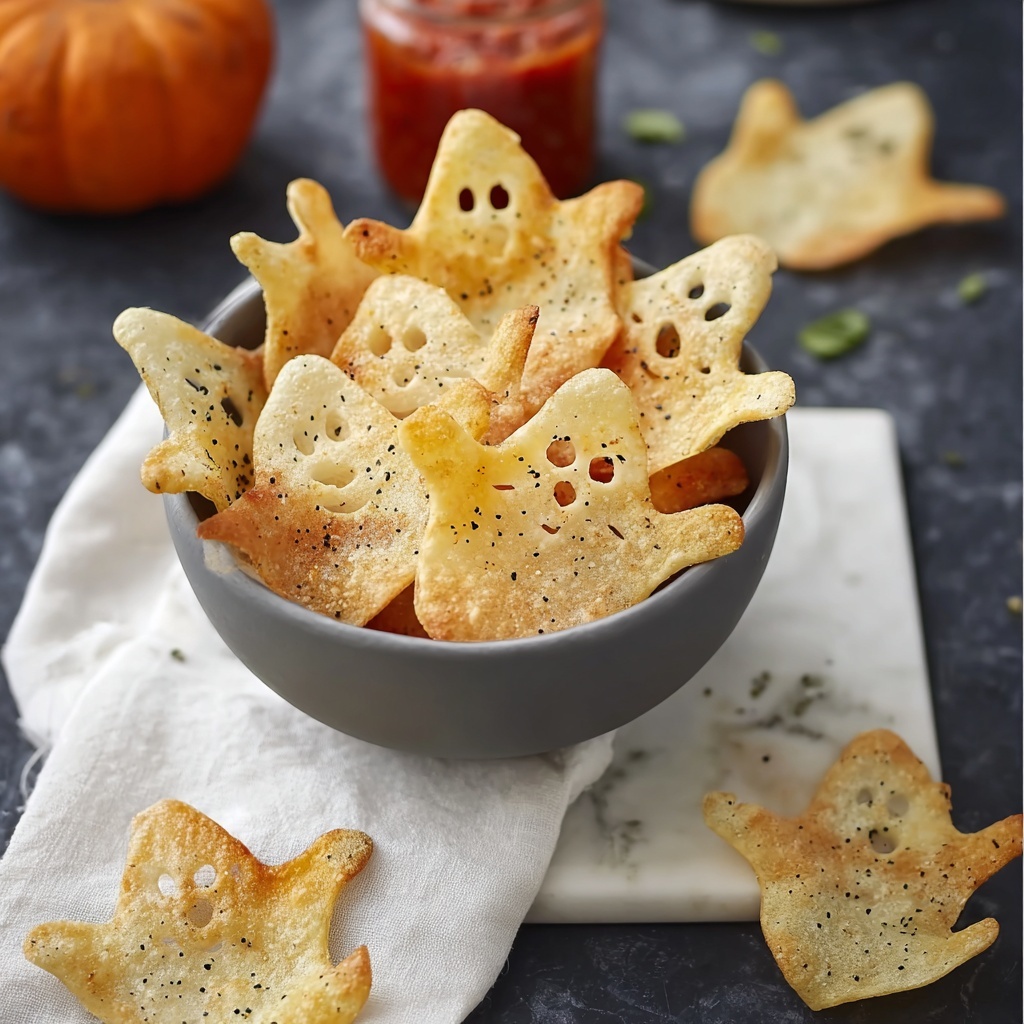
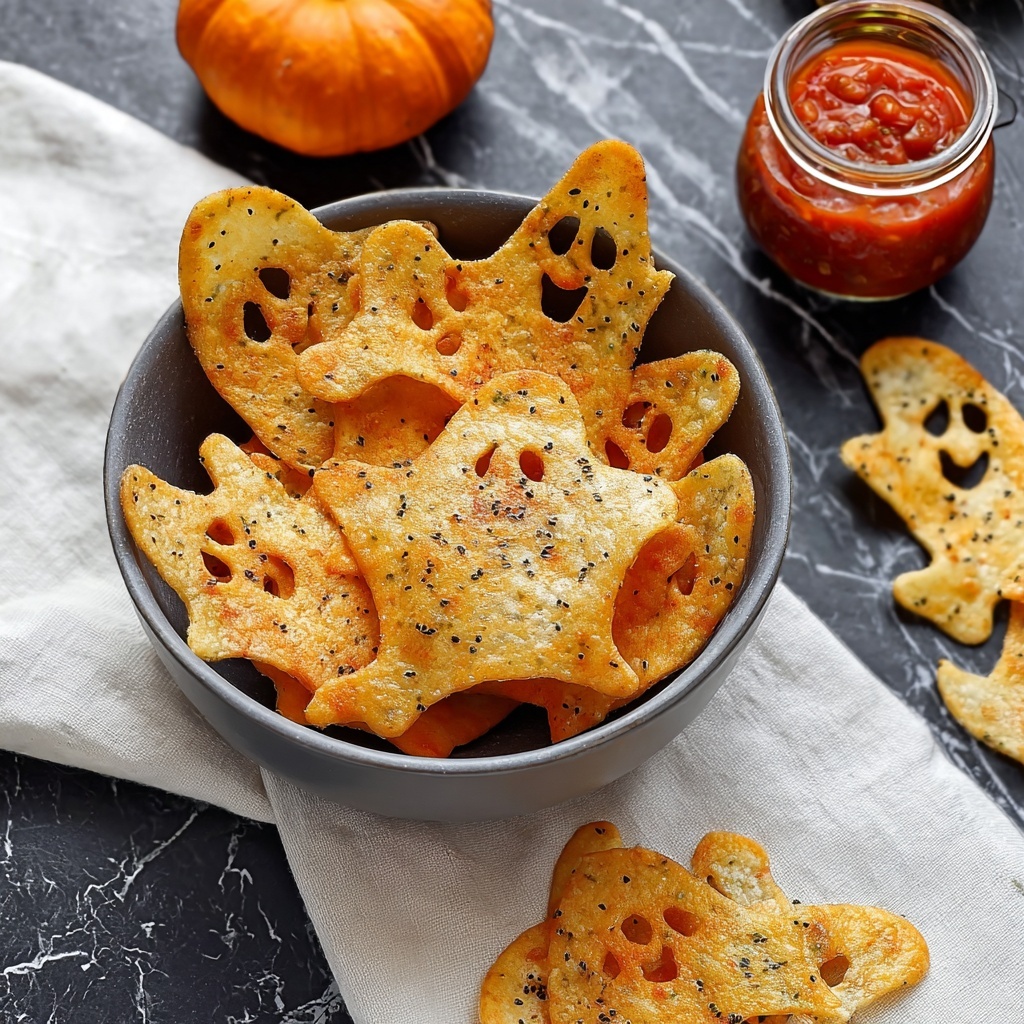
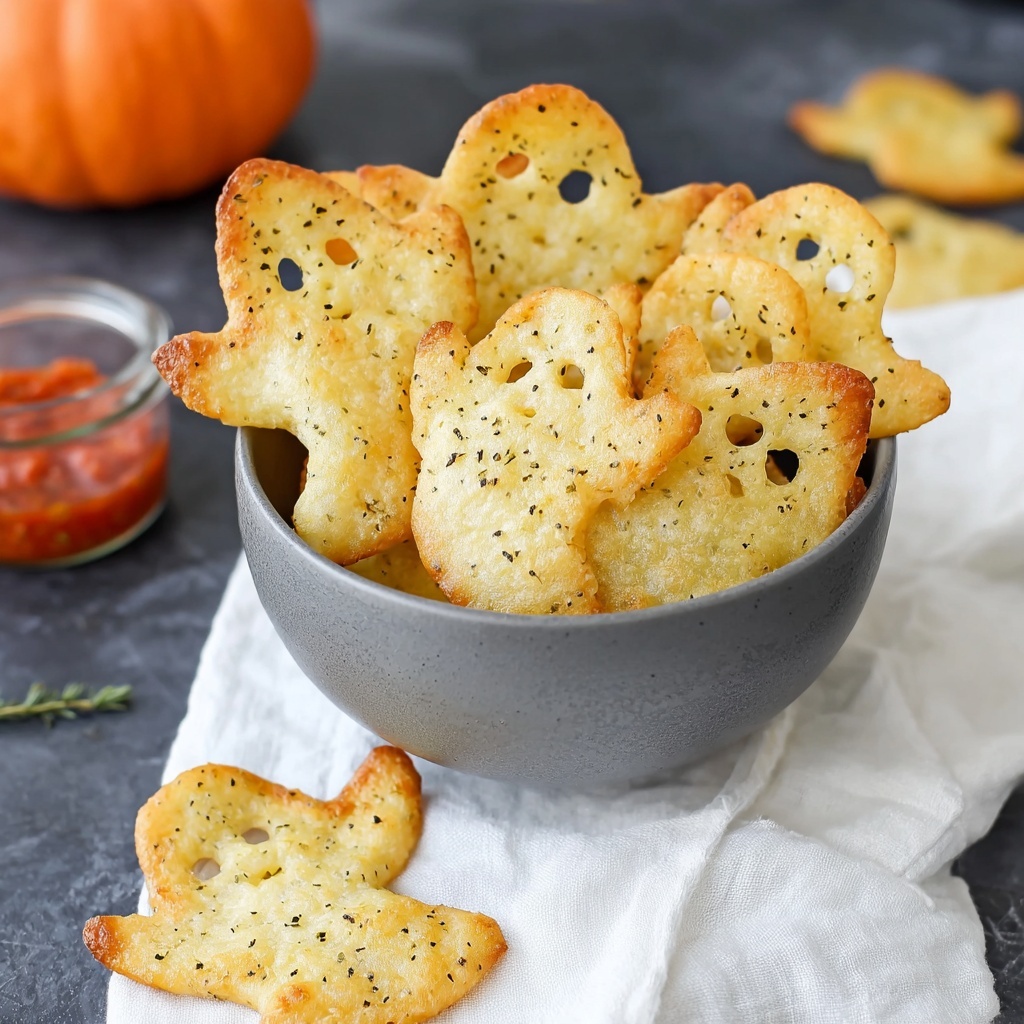
If you’re looking to add a fun, festive crunch to your Halloween celebrations, this Spooky Baked Halloween Chips Recipe is an absolute must-try. Imagine perfectly crispy tortilla chips cut into delightful Halloween shapes, lightly seasoned and baked to golden-brown perfection. This recipe is not only simple but brings a playful touch to your party snacks, making it a favorite among kids and adults alike. It’s a clever way to serve something both tasty and themed without any fuss in the kitchen.
Ingredients You’ll Need
The magic of this Spooky Baked Halloween Chips Recipe lies in the straightforwardness and quality of the ingredients. Each one plays a vital role in creating chips that are crispy, flavorful, and visually festive.
- Flour tortillas: The perfect base that crisps up beautifully when baked and is easy to shape.
- Avocado or olive oil spray: Adds a light coating of healthy fat to help the chips bake to golden perfection without greasiness.
- Salt: Enhances the natural flavors and ensures each bite is perfectly seasoned.
How to Make Spooky Baked Halloween Chips Recipe
Step 1: Prepare Workspace
First things first, preheat your oven to 375°F (190°C). Lining your baking sheets with parchment paper is a simple trick that prevents sticking and makes cleanup a breeze. This preparation sets the stage for evenly baked chips.
Step 2: Cut Spooky Shapes
Stack 2 or 3 tortillas to make cutting faster and more efficient. Using Halloween-themed cookie cutters adds an instant festive vibe while keeping the shapes uniform. Be gentle as you transfer these cutouts to your baking sheets, avoiding any overlap to ensure they bake evenly.
Step 3: Oil and Season
Give each chip a delicate spray of avocado or olive oil on both sides—this helps them become crispy without frying. Then, sprinkle salt generously and evenly. This step packs the flavor and produces that crave-worthy crunch.
Step 4: Bake to Crispy Perfection
Pop the baking sheets into the oven and bake for 8 to 12 minutes. Keep a close eye on them—the difference between golden and burnt is just a couple of minutes here. Halfway through, rotate your pans if you’re using more than one to guarantee even cooking.
Step 5: Cool and Serve
Once out of the oven, immediately transfer the chips to a wire rack. Cooling on a rack lets air circulate, helping them crisp up even more. Serve right away for the best texture, or keep them fresh by storing in an airtight container at room temperature for 3 to 4 days.
How to Serve Spooky Baked Halloween Chips Recipe
Garnishes
A sprinkle of extra salt or a dash of paprika offers a subtle smoky hint to your chips. You can even add some finely chopped fresh herbs like cilantro or chives to brighten the flavors and add a pop of green that contrasts beautifully with the orange and black Halloween shapes.
Side Dishes
These chips pair perfectly with classic dips like guacamole, salsa, or a creamy queso. For a Halloween twist, try a black bean dip or a vibrant orange roasted pumpkin hummus to keep the spooky theme consistent and delicious.
Creative Ways to Present
Arrange your chips on a rustic wooden board surrounded by small bowls of dips decorated with spooky labels. Use Halloween-themed napkins and place mini pumpkin decorations around for an irresistible festive display. Kids especially will love grabbing these little ghost and pumpkin bites right off the platter.
Make Ahead and Storage
Storing Leftovers
If you have any leftover spooky chips, store them in an airtight container at room temperature. They stay delightfully crunchy for up to 3 or 4 days, so you can keep the fun going well after your Halloween party.
Freezing
Although these chips are best fresh, you can freeze them if needed. Place them in a freezer-safe zip-top bag, separating layers with parchment paper. When you want to enjoy them, simply let them thaw at room temperature before reheating.
Reheating
To bring back that delightful crunch, reheat the chips in a warm oven at 300°F (150°C) for about 5 minutes. This quick refresh avoids sogginess and revives their baked crispness, making them taste almost as good as freshly made.
FAQs
Can I use whole wheat tortillas for this recipe?
Absolutely! Whole wheat tortillas work great and add a nice nutty flavor while keeping the same crispiness after baking.
What if I don’t have Halloween-themed cookie cutters?
No worries! You can use kitchen scissors to cut fun shapes freehand or try any small cookie cutters you have to keep the festive spirit alive.
Is it better to use avocado oil spray or olive oil spray?
Both oils work well. Avocado oil has a mild flavor and a higher smoke point, while olive oil adds a bit more richness. Choose based on your flavor preference.
How can I make the chips crispier?
Make sure to bake at the recommended temperature and avoid overlapping the chips on the baking sheet so they crisp evenly. Also, cooling on a wire rack helps improve crispness.
Can this recipe be made grain-free?
Yes! Look for grain-free tortillas made from alternative flours like almond or cassava to keep this Spooky Baked Halloween Chips Recipe suitable for grain-free diets.
Final Thoughts
Trying out this Spooky Baked Halloween Chips Recipe is a fantastic way to add excitement and flavor to your Halloween festivities. It’s easy to make, fun to share, and sure to delight everyone with its crispy, festive charm. So grab your cookie cutters and get ready for a snack that brings Halloween spirit right to your taste buds!
Print
Spooky Baked Halloween Chips Recipe
- Prep Time: 10 minutes
- Cook Time: 12 minutes
- Total Time: 22 minutes
- Yield: 32 servings
- Category: Snack
- Method: Baking
- Cuisine: American
- Diet: Gluten Free
Description
These Spooky Baked Halloween Chips are a fun, crunchy snack perfect for festive gatherings. Made from flour tortillas cut into Halloween-themed shapes, lightly coated with avocado or olive oil spray, and sprinkled with salt, then baked to golden crispiness. They’re easy to prepare, gluten-free and grain-free options are available, making them a versatile and delicious treat to enjoy all season long.
Ingredients
Ingredients
- 4 flour tortillas (gluten-free or grain-free, as needed)
- Avocado or olive oil spray
- Salt, to taste
Instructions
- Prepare Workspace: Preheat your oven to 375°F (190°C) and line two large baking sheets with parchment paper to prevent sticking and ensure even baking.
- Cut Spooky Shapes: Stack 2 to 3 tortillas together and use Halloween-themed cookie cutters to press firmly and cut out shapes. Carefully arrange the cut shapes in a single layer on the prepared baking sheets, making sure they do not overlap for even crisping.
- Oil and Season: Lightly spray both sides of each tortilla shape with avocado or olive oil spray to help them crisp up. Then sprinkle generously and evenly with salt to taste.
- Bake to Crispy Perfection: Place the baking sheets in the oven and bake for 8 to 12 minutes until the chips turn golden brown and become crispy. Keep an eye on them to avoid burning, and rotate the baking sheets halfway through cooking if baking multiple sheets at once.
- Cool and Serve: Once baked, transfer the chips immediately to a wire cooling rack and allow them to cool completely. This will help them crisp up further. Serve the chips fresh or store in an airtight container at room temperature for 3 to 4 days.
Notes
- Use gluten-free or grain-free tortillas for dietary preferences or needs.
- Be careful not to overbake to avoid burning the chips.
- These chips are best enjoyed within a few days for maximum crunchiness.
- Try different seasonings like paprika, garlic powder, or chili powder for varied flavors.


