
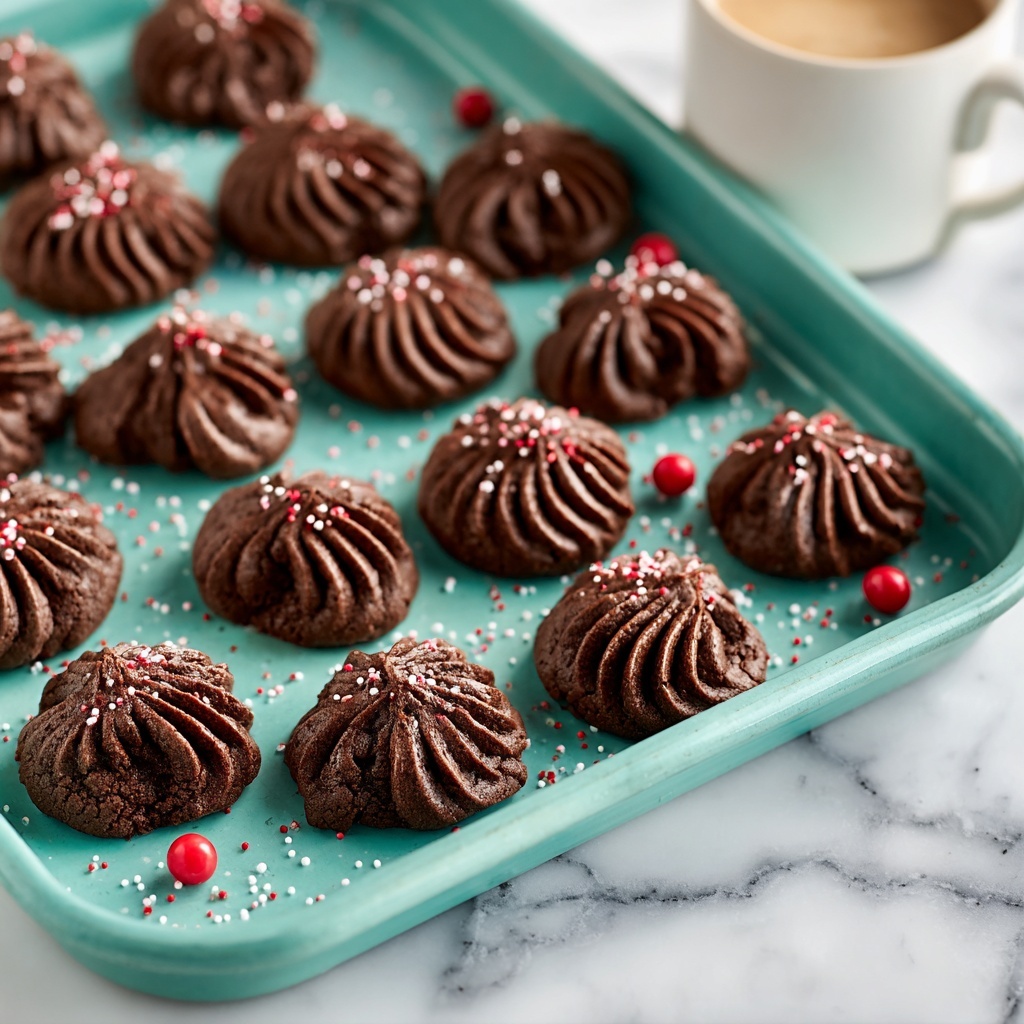
If you’ve ever yearned for a cookie that’s both elegant and irresistibly delicious, the Piped Chocolate Butter Cookies Recipe is the perfect treat to satisfy your craving. These cookies have such a delightful melt-in-your-mouth texture paired with rich cocoa flavor, all wrapped up in beautifully piped shapes that make each bite as pretty as it is tasty. Whether you’re baking for a special occasion or simply to brighten your day with some homemade love, this recipe brings together simplicity and a touch of fancy that’s sure to impress everyone who tries them.

Ingredients You’ll Need
This recipe is a wonderful example of how a handful of simple ingredients can come together to create cookie magic. Each ingredient plays its part beautifully, from the creamy richness of butter to the deep chocolaty notes of cocoa powder.
- 1 cup unsalted butter, softened: The base that gives these cookies their luscious buttery flavor and tender texture.
- ½ cup powdered sugar: Provides a delicate sweetness and helps achieve that almost melt-in-your-mouth crumb.
- 1 teaspoon vanilla extract: Adds warmth and enhances the chocolate flavor without overpowering.
- 1¾ cups all-purpose flour: Gives structure while keeping the cookies light and tender.
- ¼ cup unsweetened cocoa powder: Delivers the unmistakable chocolate richness that makes these cookies special.
- 1-2 tablespoons milk: Used sparingly to perfect the dough’s piping consistency, ensuring every cookie shape holds steady.
- Melted chocolate for drizzling: This is for an optional elegant finish that adds an extra layer of chocolatey goodness.
- Sprinkles or chopped nuts: Perfect for a fun or textured garnish, personalizing your cookies to fit any occasion.
How to Make Piped Chocolate Butter Cookies Recipe
Step 1: Preheat and Prepare Your Baking Sheets
Start by preheating your oven to 350°F (175°C). Line your baking sheets with parchment paper to prevent sticking and make cleanup easier. This simple step sets you up for perfectly baked cookies every time.
Step 2: Cream Butter and Powdered Sugar
Using a mixer, beat the softened unsalted butter and powdered sugar together until the mixture is light and fluffy. This usually takes about 2 to 3 minutes. This step is crucial because it incorporates air, making the cookies tender and giving them a delicate crumb.
Step 3: Add Vanilla and Dry Ingredients
Mix in the vanilla extract next. Then, gradually add the all-purpose flour and unsweetened cocoa powder to the creamed butter mixture. Stir until you form a soft dough. If it’s a little stiff for piping, add 1 to 2 tablespoons of milk to adjust the consistency to a smooth pipe-able dough.
Step 4: Pipe Your Cookies
Fill a piping bag fitted with a large star tip with your dough. Pipe beautiful shapes—like rosettes or pretzel forms—onto your prepared baking sheets. Piping the dough creates that classic decorative look that makes these cookies stand out at any gathering.
Step 5: Bake to Perfection
Bake the piped cookies for 10 to 12 minutes until the edges are set but the centers remain tender. After baking, let them cool on the baking sheet for 5 minutes before carefully transferring them to a wire rack. This cooling period sets their shape and texture perfectly.
Step 6: Decorate (Optional)
Once your cookies have cooled, it’s time to get creative. Drizzle melted chocolate over the tops or dip them halfway in chocolate. Add sprinkles or chopped nuts for an extra festive touch. This step transforms your cookies into edible pieces of art, perfect for sharing or gifting.
How to Serve Piped Chocolate Butter Cookies Recipe
Garnishes
For a charming finishing touch, a light drizzle of melted chocolate or a sprinkle of colorful sugar crystals brings added texture and visual appeal. Chopped nuts lend a bit of crunch, which balances well with the buttery softness of the cookie.
Side Dishes
Pair these cookies with a hot cup of coffee, a bold espresso, or a rich cup of hot cocoa to enhance their chocolatey goodness. Fresh berries or a dollop of whipped cream also complement their flavor beautifully, making each bite feel like a little celebration.
Creative Ways to Present
Arrange your cookies on a beautiful platter alongside fresh flowers or pastel-colored napkins for a charming teatime display. Layer them between sheets of parchment paper in a gift box for a delightful homemade gift. The elegant piped shapes make them perfect for fancy celebrations or everyday treats.
Make Ahead and Storage
Storing Leftovers
Store your Piped Chocolate Butter Cookies in an airtight container at room temperature. They stay fresh for up to a week, maintaining their tender texture and rich flavor. Keep them away from direct sunlight to preserve their color and taste.
Freezing
If you want to enjoy these cookies later, freeze them in a single layer on a baking sheet first. Once frozen, transfer to a sealed freezer bag or container. This method prevents them from sticking together and keeps them just as fresh. They freeze well for up to 2 months.
Reheating
To refresh your cookies after storage or freezing, let them come to room temperature naturally, or warm gently in a low oven (about 300°F) for a few minutes. This restores their soft texture and the aroma will fill your kitchen up with pure comfort.
FAQs
Can I use salted butter instead of unsalted?
Yes, you can, but just be mindful that salted butter will add extra saltiness to the cookies. I recommend reducing any added salt elsewhere in the recipe to keep the flavors balanced.
What’s the best piping tip to use for these cookies?
A large star tip is ideal as it creates those lovely ridges and texture that make piped cookies visually stunning and allow for even baking.
Can I substitute cocoa powder with melted chocolate?
While cocoa powder gives these cookies their distinctive dry chocolate flavor and nice crumb, you can experiment with melted chocolate. Just keep in mind it will affect the dough’s consistency and may require adjusting the flour and butter.
How do I prevent my cookies from spreading too much during baking?
Make sure your butter is softened but not melted, and that your dough is at the right consistency for piping. Chilling the dough briefly before piping can also help maintain shape.
Can I add other flavors to the dough?
Absolutely! Adding a hint of almond extract or espresso powder can deepen the chocolate flavor wonderfully. Just add small amounts so as not to overpower the classic taste.
Final Thoughts
I truly hope you take a moment to try this Piped Chocolate Butter Cookies Recipe because it’s one of those joyfully simple desserts that feels special every time you make it. From the crumbly yet tender texture to the rich chocolate color and that satisfying buttery flavor, these cookies are a small indulgence you deserve to enjoy at home or share with friends. Get your piping bag ready and let the magic unfold—you’re going to love every bite!
Print
Piped Chocolate Butter Cookies Recipe
- Prep Time: 15 minutes
- Cook Time: 12 minutes
- Total Time: 27 minutes
- Yield: 24 servings
- Category: Dessert
- Method: Baking
- Cuisine: American
- Diet: Vegetarian
Description
These Piped Chocolate Butter Cookies are a delightful treat featuring a rich cocoa flavor combined with a buttery, tender texture. Perfectly piped into elegant shapes and optionally decorated with melted chocolate and sprinkles or nuts, these cookies are simple to prepare and ideal for festive occasions or everyday indulgence.
Ingredients
Cookie Dough
- 1 cup unsalted butter, softened
- ½ cup powdered sugar
- 1 teaspoon vanilla extract
- 1¾ cups all-purpose flour
- ¼ cup unsweetened cocoa powder
- 1–2 tablespoons milk (as needed for piping consistency)
Decoration (Optional)
- Melted chocolate for drizzling
- Sprinkles or chopped nuts
Instructions
- Preheat the Oven: Preheat your oven to 350°F (175°C) and line baking sheets with parchment paper to prevent sticking and ensure easy cleanup.
- Cream Butter and Sugar: Beat softened unsalted butter and powdered sugar together using a mixer until the mixture is light and fluffy, which should take about 2 to 3 minutes. This step is important for a tender cookie texture.
- Add Vanilla and Dry Ingredients: Mix in the vanilla extract. Gradually add the all-purpose flour and unsweetened cocoa powder, mixing continuously until a soft dough forms. Add milk, one tablespoon at a time, if needed to achieve the right consistency for piping.
- Prepare for Piping: Transfer the dough into a piping bag fitted with a large star tip. Pipe the dough onto the prepared baking sheets in your desired shapes, spacing them adequately as they will spread slightly during baking.
- Bake: Place the baking sheets in the preheated oven and bake for 10 to 12 minutes, or until the edges of the cookies are set but the centers remain slightly soft. Remove from oven and allow cookies to cool on the sheets for 5 minutes before transferring them to a wire rack to cool completely.
- Decorate (Optional): Once the cookies have cooled, drizzle or dip them in melted chocolate and decorate with sprinkles or chopped nuts to add an extra layer of flavor and visual appeal.
Notes
- Ensure the butter is softened to room temperature for easy creaming and a smooth dough.
- If the dough is too stiff for piping, add a small amount of milk to adjust the consistency.
- Use a large star piping tip for beautiful textured cookie designs.
- Cookies are best stored in an airtight container at room temperature for up to one week.
- For a stronger chocolate flavor, use Dutch-processed cocoa powder.


