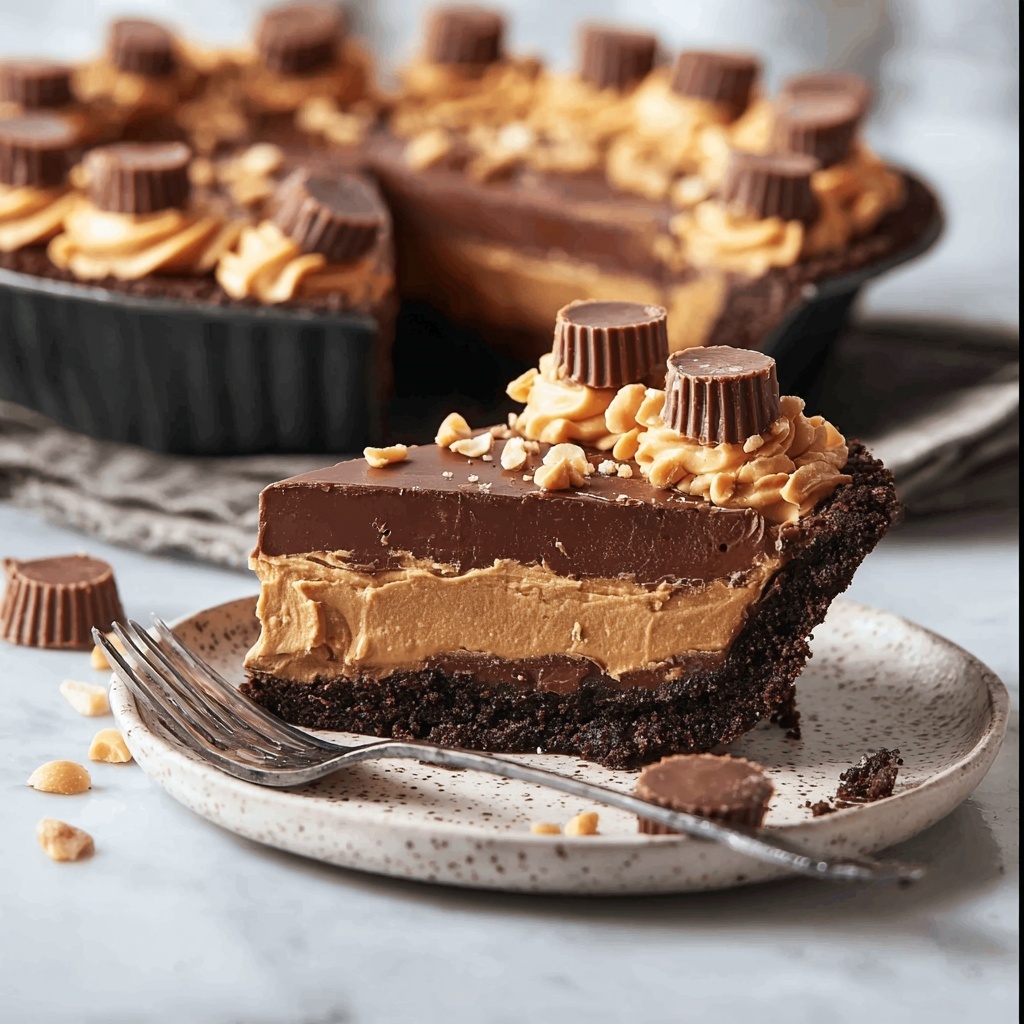
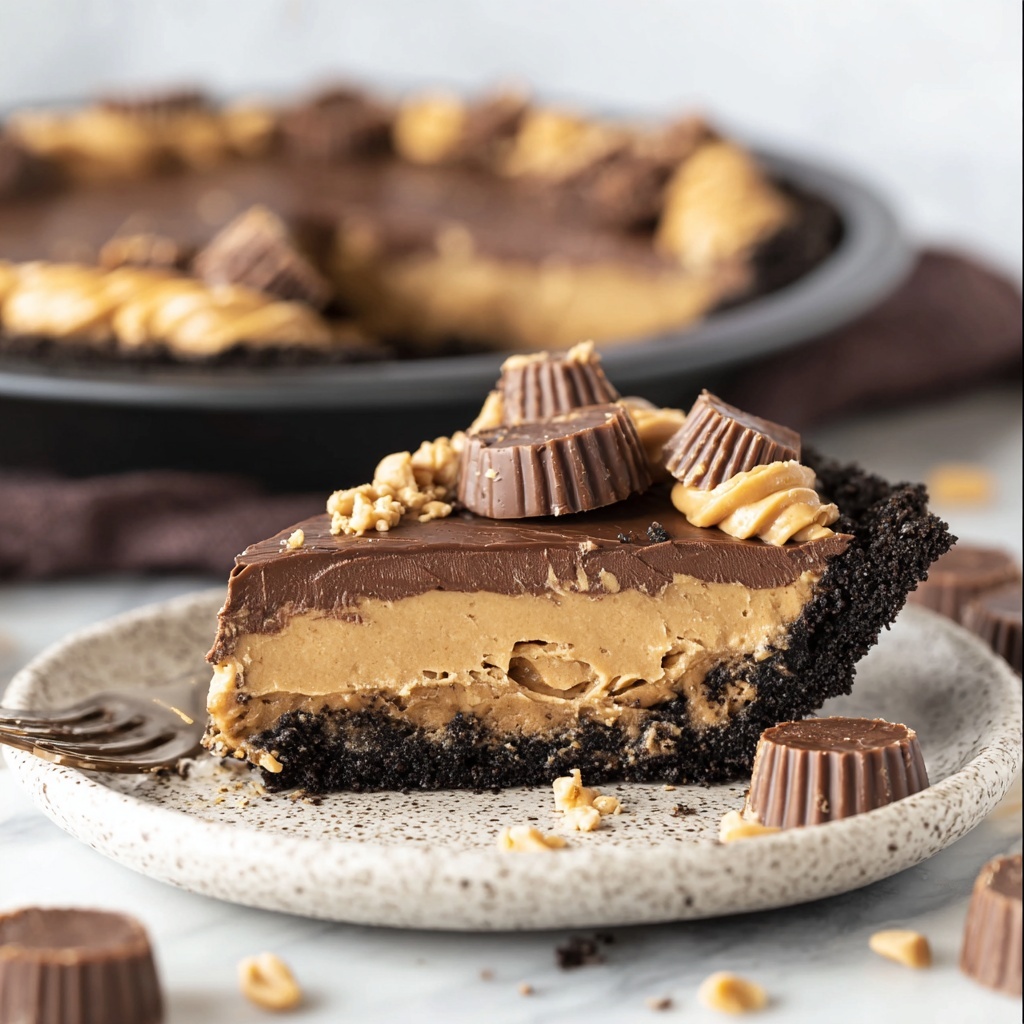
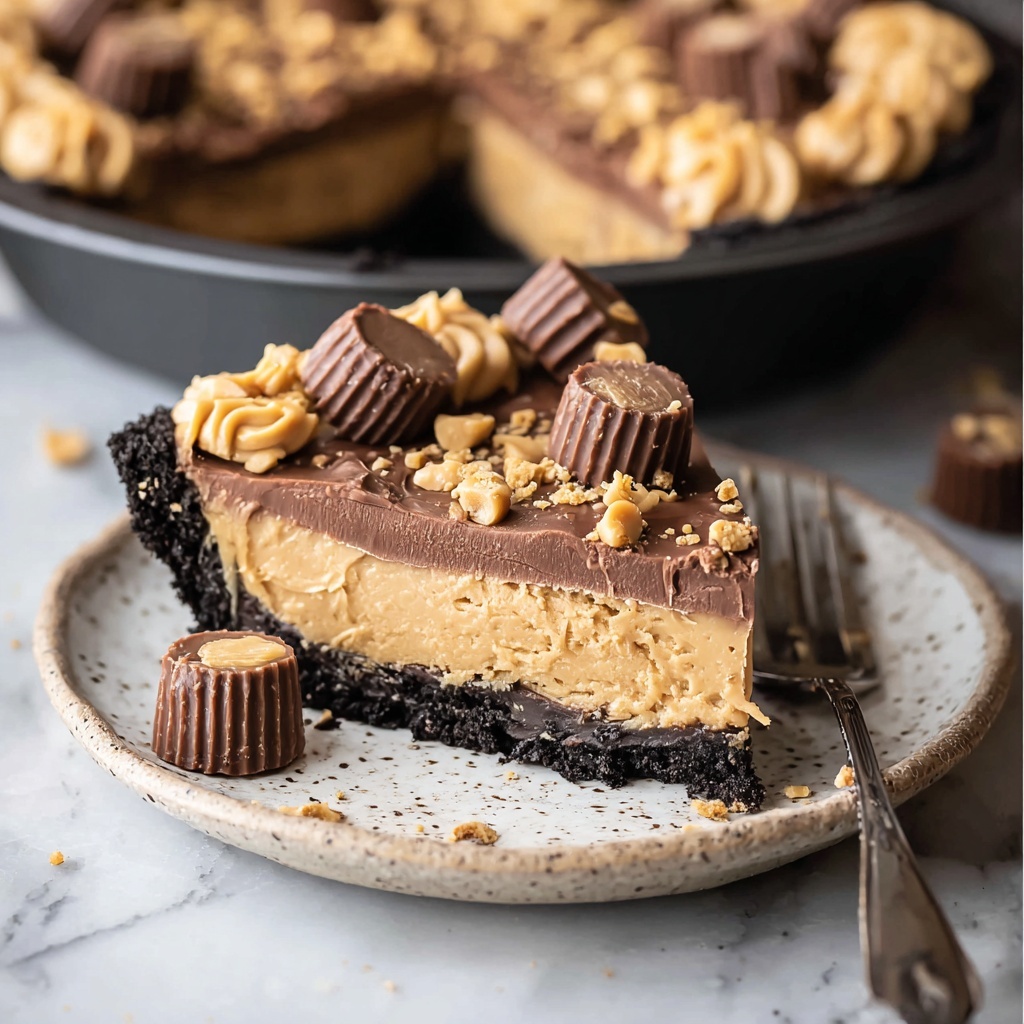
If you adore the magical combination of rich chocolate and creamy peanut butter, then this Peanut Butter Cup Chocolate Pie Recipe is bound to become your new favorite indulgence. Imagine a luscious peanut butter filling swirled with chunks of peanut butter cups, cradled in a crunchy Oreo crust and drizzled with warm fudge sauce—every bite is a perfect harmony of flavors and textures that feels like a celebration in your mouth. Whether for a special occasion or a weekend treat, this pie offers a dreamy dessert experience that’s as delightful to make as it is to savor.
Ingredients You’ll Need
Gathering the ingredients for this pie is a breeze, yet each one plays a vital role in building its irresistible taste and satisfying texture. From the cookie crust that provides a chocolatey crunch to the creamy peanut butter filling and the decadent fudge drizzle, every component shines.
- Oreo cookies (24, crushed): The foundation of the crust, offering that signature chocolaty crunch that contrasts perfectly with the creamy filling.
- Unsalted butter (5 tablespoons, melted): Binds the crushed Oreos together for a sturdy, flavorful crust.
- Creamy peanut butter (1 cup): Delivers the rich, nutty flavor that is the soul of this pie.
- Cream cheese (8 oz, softened): Adds a silky texture and slight tang to balance the sweetness.
- Powdered sugar (1 cup): Sweetens the filling smoothly without graininess.
- Vanilla extract (1 teaspoon): Enhances the overall flavor with a warm, subtle aroma.
- Cool Whip or whipped topping (8 oz, thawed): Lightens the filling, making it airy and luscious.
- Mini Reese’s peanut butter cups (1 ½ cups, chopped): Brings bursts of peanut butter and chocolate throughout the filling and as a garnish for an extra wow factor.
- Hot fudge sauce (½ cup, warmed): A luscious drizzle that ties everything together with a glossy, indulgent finish.
How to Make Peanut Butter Cup Chocolate Pie Recipe
Step 1: Prepare the Crust
Begin by preheating your oven to 350°F (175°C), so it’s ready to give your crust the perfect bake. In a medium bowl, mix the crushed Oreo cookies with the melted butter until every crumb is coated. Press this mixture firmly into the bottom and up the sides of a 9-inch pie dish, creating a chocolatey shell that will hold all your creamy filling. Pop it in the oven for 10 minutes to let it set, then cool completely—which is key to getting that satisfying crunch with each forkful.
Step 2: Make the Filling
While the crust cools, let’s turn to that dreamy filling. In a large bowl, beat together the creamy peanut butter and softened cream cheese until silky smooth with no lumps in sight. Next, add the powdered sugar and vanilla extract, continuing to beat until everything is combined just right. Gently fold in the thawed Cool Whip, which makes the filling light and fluffy—it’s the secret step that keeps this pie from being too dense. Stir in the chopped mini Reese’s peanut butter cups, sprinkling in those little bursts of peanut buttery chocolate magic that elevate this pie to legendary status.
Step 3: Assemble the Pie
Now comes the fun part: pouring that luscious filling into the cooled Oreo crust. Spread it evenly across, smoothing the top so every slice will look as good as it tastes. Warm the hot fudge sauce slightly—just enough to drizzle it smoothly over the pie’s surface before sprinkling with the remaining chopped mini Reese’s peanut butter cups. The pie is now dressed and ready for chilling.
Step 4: Chill and Set
To get that perfect sliceable texture, refrigerate your pie for at least two hours. This wait time allows the filling to firm up and all those incredible flavors to meld together beautifully. Trust me, it’s worth the patience!
How to Serve Peanut Butter Cup Chocolate Pie Recipe
Garnishes
Feel free to jazz up your slice with a dollop of whipped cream or an extra drizzle of hot fudge just before serving. You can even add some chopped peanuts for a little crunch and extra peanut flavor. These simple touches make each serving feel special and inviting.
Side Dishes
This pie pairs wonderfully with fresh berries or a scoop of vanilla ice cream that adds a cool contrast to the rich pie. A light coffee or milk on the side also complements the flavors and balances the sweetness perfectly.
Creative Ways to Present
For a crowd-pleaser, slice the pie into bite-sized squares and serve on a platter with mini forks for easy sharing. Or try layering the filling and crust in individual dessert glasses, topping each with fudge drizzle and peanut butter cup pieces for a pretty, personalized presentation that will impress anyone lucky enough to dig in.
Make Ahead and Storage
Storing Leftovers
After enjoying your pie, wrap any leftovers tightly with plastic wrap or store them in an airtight container to keep the flavors fresh and the crust crisp. Refrigerate leftover slices for up to 4 days—you’ll be amazed at how well they maintain their richness and texture.
Freezing
You can freeze the pie for longer storage by wrapping it carefully with plastic wrap and foil. Thaw it overnight in the refrigerator before serving to preserve its creamy, dreamy consistency. Keep in mind that the texture of the whipped topping may lighten slightly after freezing, but the flavor remains just as incredible.
Reheating
This pie is best enjoyed chilled, so reheating is not recommended. However, if you prefer your fudge sauce warm, simply heat it separately and drizzle on top just before serving for that perfect gooey effect.
FAQs
Can I use crunchy peanut butter instead of creamy?
Absolutely! Using crunchy peanut butter will add a bit of texture inside the filling, giving you an even nuttier, more interesting bite. Just keep in mind the filling might be slightly less smooth.
Is it possible to make this pie gluten-free?
Yes, just swap the Oreo cookies for a gluten-free chocolate cookie crumble and ensure the fudge sauce and peanut butter cups are gluten-free as well. This way, everyone can enjoy this delicious Peanut Butter Cup Chocolate Pie Recipe safely.
How long does the pie need to chill before serving?
You should refrigerate the pie for at least two hours, but overnight chilling makes it even better because the flavors have more time to meld and the filling firms up perfectly for clean slices.
Can I make this pie ahead of time for a party?
Definitely! This pie is one of the best make-ahead desserts—prepare it the day before your event, keep it refrigerated, and it will still taste fresh and amazing when it’s party time.
What can I substitute for Cool Whip if I want to make it from scratch?
You can whip heavy cream with a little sugar and vanilla until stiff peaks form to replace Cool Whip. This fresh whipped cream alternative will give your filling a natural and creamy texture just as lovely.
Final Thoughts
Making this Peanut Butter Cup Chocolate Pie Recipe is like crafting a little piece of dessert heaven at home. It’s simple enough to whip up on any day, but indulgent enough to impress friends, family, or even just to treat yourself after a long week. Once you try it, you’ll understand why it’s such a favorite—every forkful feels like a cozy hug wrapped in peanut butter and chocolate. So go ahead, dive in and enjoy every delicious bite!
Print
Peanut Butter Cup Chocolate Pie Recipe
- Prep Time: 30 minutes
- Cook Time: 10 minutes
- Total Time: 2 hours 40 minutes
- Yield: 10 servings
- Category: Dessert
- Method: Baking
- Cuisine: American
Description
This Peanut Butter Cup Chocolate Pie is a decadent and creamy dessert combining the rich flavors of peanut butter, chocolate, and Oreo crust. Perfectly chilled and topped with mini Reese’s peanut butter cups and hot fudge, this pie is a crowd-pleaser that’s easy to make and sure to satisfy your sweet tooth.
Ingredients
Crust
- 24 Oreo cookies, crushed (about 2 cups)
- 5 tablespoons unsalted butter, melted
Filling
- 1 cup creamy peanut butter
- 8 oz cream cheese, softened
- 1 cup powdered sugar
- 1 teaspoon vanilla extract
- 8 oz Cool Whip or whipped topping, thawed
- 1 cup mini Reese’s peanut butter cups, chopped
Topping
- 1/2 cup hot fudge sauce, warmed
- 1/2 cup mini Reese’s peanut butter cups, chopped
Instructions
- Prepare the Crust: Preheat your oven to 350°F (175°C). In a medium bowl, mix the crushed Oreo cookies with the melted butter until well combined. Press this mixture firmly into the bottom and up the sides of a 9-inch pie dish to form the crust.
- Bake the Crust: Bake the crust in the preheated oven for 10 minutes. After baking, remove it and allow it to cool completely before adding the filling.
- Make the Filling: In a large bowl, beat together the creamy peanut butter and softened cream cheese until the mixture is smooth and creamy. Add the powdered sugar and vanilla extract, then beat again until fully combined.
- Incorporate Whipped Topping: Gently fold in the thawed Cool Whip or whipped topping until the filling is smooth and fluffy. Then stir in 1 cup of the chopped mini Reese’s peanut butter cups evenly throughout the filling.
- Assemble the Pie: Pour the peanut butter filling into the cooled Oreo crust and spread it out evenly.
- Add Toppings: Drizzle the warmed hot fudge sauce over the top of the pie. Sprinkle the remaining 1/2 cup of chopped mini Reese’s peanut butter cups on top for extra texture and flavor.
- Chill the Pie: Refrigerate the assembled pie for at least 2 hours to allow it to set properly and enhance the flavors.
- Serve: Once chilled and set, slice the pie and enjoy the rich, creamy peanut butter cup chocolate delight.
Notes
- For the best texture, ensure the cream cheese is softened before mixing.
- You can substitute Cool Whip with homemade whipped cream if preferred.
- If you don’t have mini Reese’s peanut butter cups, regular-sized ones can be chopped and used instead.
- To avoid a soggy crust, make sure to completely cool the crust before adding the filling.
- This pie should be stored in the refrigerator and consumed within 3 days for optimal freshness.


