
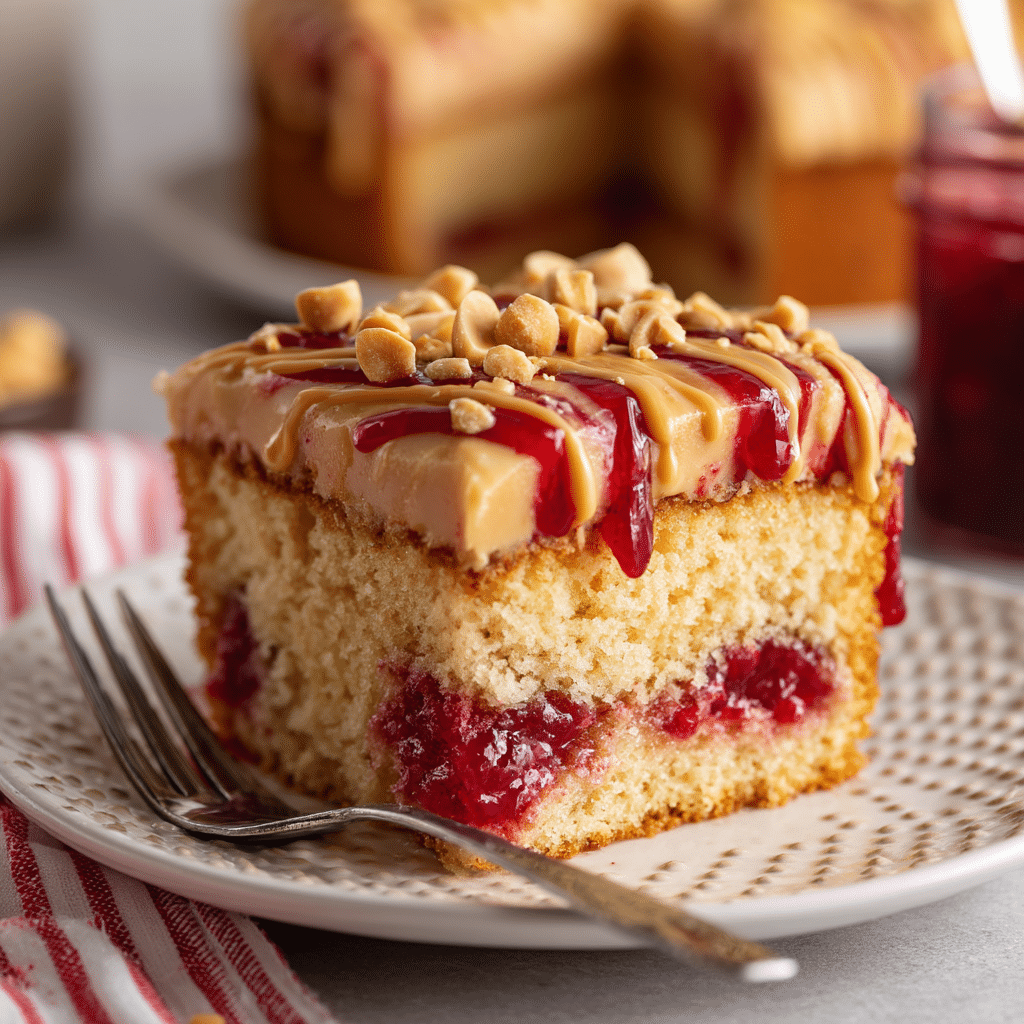
This Peanut Butter and Jelly Poke Cake is what nostalgic dreams are made of—with a fun, indulgent twist! It’s the classic PB&J combo we all grew up loving, but reimagined into a moist, tender cake that’s laced with fruity jam and topped with a creamy peanut butter whipped topping. It’s incredibly easy to put together, making it the perfect dessert for busy weeknights, potlucks, or whenever that sweet tooth strikes. Each bite is soft, gooey, sweet, and just the right amount of salty. Total comfort food with a playful punch!
Why You’ll Love This Recipe
- Super Simple: Uses a boxed cake mix for convenience, but feels totally homemade once you add all the fun layers.
- Nostalgic and Fun: Brings back the classic sandwich vibes in dessert form—great for kids and adults alike.
- Perfect Make-Ahead Dessert: Actually gets better as it sits, which makes it ideal for prepping ahead of time.
- Customizable: Use your favorite jam, swap the topping, or add extras like crushed peanuts or fresh berries.
Ingredients You’ll Need

Here’s what makes this cake so irresistible—and so easy to pull together:
- Yellow Cake Mix: The base of the cake. It’s moist, tender, and neutral enough to let the PB&J flavors shine. Vanilla or white cake mix also works.
- Eggs, Oil, and Water: To prepare the cake mix according to package instructions.
- Fruit Jam or Jelly: Strawberry or grape are classic, but raspberry or even blueberry jam can add a unique twist. Warm it slightly so it spreads easily into the holes.
- Sweetened Condensed Milk: Poured into the cake holes to add incredible moisture and richness.
- Creamy Peanut Butter: Stirred into the whipped topping for a velvety, nutty layer that pulls it all together.
- Whipped Topping (like Cool Whip): Lightens up the peanut butter and gives the cake a fluffy, mousse-like top.
- Peanuts (optional): For crunch and texture, sprinkle some chopped roasted peanuts on top.
Variations
Want to get creative? You absolutely should! Here are some fun ways to switch things up:
- Jam Flavors: Try peach, apricot, or blackberry jam for a fruity change-up.
- Nut Butter Swaps: Almond butter or cashew butter work great for a different nutty twist.
- Chocolate Drizzle: A little melted chocolate over the top takes it over the top.
- Layer of Sliced Bananas: Add a banana layer between the cake and the whipped topping for a PB&J-banana combo.
- Cupcake Style: Bake in cupcake tins for individual servings—just adjust the poke-and-fill technique slightly.
How to Make Peanut Butter and Jelly Poke Cake
Step 1: Bake the Cake
Prepare your yellow cake mix according to the package instructions and bake it in a 9×13-inch pan. Once it’s done, let it cool for about 10 minutes.
Step 2: Poke and Pour
Use the end of a wooden spoon to poke holes all over the cake. Make sure you go deep enough so the filling can seep in. Then, pour the sweetened condensed milk over the top, letting it sink into the holes.
Step 3: Add the Jelly
Warm your jelly or jam just enough to make it pourable. Spoon or drizzle it over the cake, aiming to fill those holes again. Use a spatula to gently spread it out if needed.
Step 4: Make the Peanut Butter Topping
In a bowl, fold creamy peanut butter into the whipped topping until smooth and fully combined. Spread this over the cooled and jelly-filled cake.
Step 5: Chill and Serve
Pop the cake into the fridge for at least 2 hours (or overnight) to set. Before serving, sprinkle with chopped peanuts for that perfect crunch!
Pro Tips for Making the Recipe
- Warm the Jam Gently: A few seconds in the microwave makes it easier to pour and spread.
- Don’t Skip the Chill Time: The flavors meld together as it chills, and the texture becomes even better.
- Use a Thick Whipped Topping: A thicker whipped topping holds its shape better when mixed with peanut butter.
- Let the Cake Cool Before Topping: If it’s too warm, the whipped topping will melt and slide around.
- Double the Jam Layer: For an extra fruity punch, swirl more jam right into the peanut butter topping.
How to Serve
This cake is a complete treat on its own, but here are a few ways to serve it up:
Straight from the Fridge:
It’s best served cold—rich, refreshing, and easier to cut clean slices.
Garnish Options:
Add a drizzle of melted peanut butter, a few fresh raspberries or strawberries, or even mini chocolate chips.
Make it a Sundae:
Top slices with a scoop of vanilla ice cream for a dreamy PB&J cake sundae moment.
Make Ahead and Storage
Storing Leftovers
Cover the cake tightly with plastic wrap or store in an airtight container in the refrigerator. It will keep well for 3-4 days and stay nice and moist.
Freezing
Yes, you can freeze it! Slice the cake, wrap each piece in plastic wrap, and store in a freezer-safe bag or container for up to 2 months. Thaw in the fridge overnight before serving.
Reheating
This cake is meant to be served cold, but if you prefer it warm, microwave individual slices for 10-15 seconds—just enough to take the chill off without melting the topping.
FAQs
Can I use homemade jam instead of store-bought?
Absolutely. Homemade jam adds a fresh, vibrant flavor. Just make sure it’s not too chunky so it pours into the holes easily.
Do I have to use whipped topping, or can I use whipped cream?
You can use freshly whipped cream, but make sure it’s stabilized with a little powdered sugar so it holds up in the fridge.
Can this be made gluten-free?
Yes! Just use a gluten-free cake mix, and ensure all other ingredients (especially jam and whipped topping) are gluten-free certified.
What if I don’t like peanut butter?
No problem—swap it with almond or cashew butter, or use a sweetened cream cheese topping instead for a cheesecake-like twist.
Final Thoughts
This Peanut Butter and Jelly Poke Cake is the ultimate dessert mashup—familiar, fun, and ridiculously easy to make. Whether you’re baking for a crowd or just need a comforting treat to enjoy after dinner, this cake delivers big on flavor and nostalgia. Don’t wait—grab those ingredients and make this dreamy dessert a reality tonight!
PrintPeanut Butter and Jelly Poke Cake Recipe
This Peanut Butter and Jelly Poke Cake is a fun twist on the classic sandwich, made into a sweet and creamy dessert. A moist vanilla or yellow cake is filled with strawberry jam, then topped with a fluffy peanut butter frosting and a drizzle of jelly. It’s the perfect nostalgic treat for parties, potlucks, or just because!
- Prep Time: 15 minutes
- Cook Time: 30 minutes
- Total Time: 45 minutes
- Yield: 12 servings
- Category: Dessert
- Method: Baking
- Cuisine: American
- Diet: Vegetarian
Ingredients
For the Cake:
-
1 box yellow cake mix (plus ingredients listed on the box: eggs, oil, water)
-
1 cup strawberry jelly or jam (slightly warmed for easier pouring)
For the Peanut Butter Frosting:
-
1 cup creamy peanut butter
-
1/2 cup unsalted butter, softened
-
2 cups powdered sugar
-
1/4 cup milk (plus more as needed)
-
1 tsp vanilla extract
Topping:
-
1/4 cup strawberry jelly or jam (for drizzling)
-
Crushed peanuts or chopped peanut butter cups (optional)
Instructions
-
Preheat your oven to 350°F (175°C). Grease a 9×13-inch baking dish.
-
Prepare and bake the cake according to the package instructions. Let it cool for about 10 minutes.
-
Using the end of a wooden spoon or a straw, poke holes all over the cake.
-
Warm 1 cup of jelly slightly in the microwave until pourable. Pour it evenly over the cake, letting it soak into the holes.
-
Let the cake cool completely.
-
In a large bowl, beat together the peanut butter and softened butter until smooth and creamy.
-
Add powdered sugar, milk, and vanilla. Beat until fluffy. Add a bit more milk if the frosting is too thick.
-
Spread the peanut butter frosting over the cooled cake.
-
Warm the extra 1/4 cup of jelly and drizzle over the frosting. Use a knife or toothpick to swirl if desired.
-
Sprinkle with crushed peanuts or chopped peanut butter cups if using.
-
Chill for 30 minutes to set, or serve immediately.
Notes
-
You can use grape jelly if you prefer the classic PB&J combo.
-
This cake tastes even better the next day once the flavors meld together.