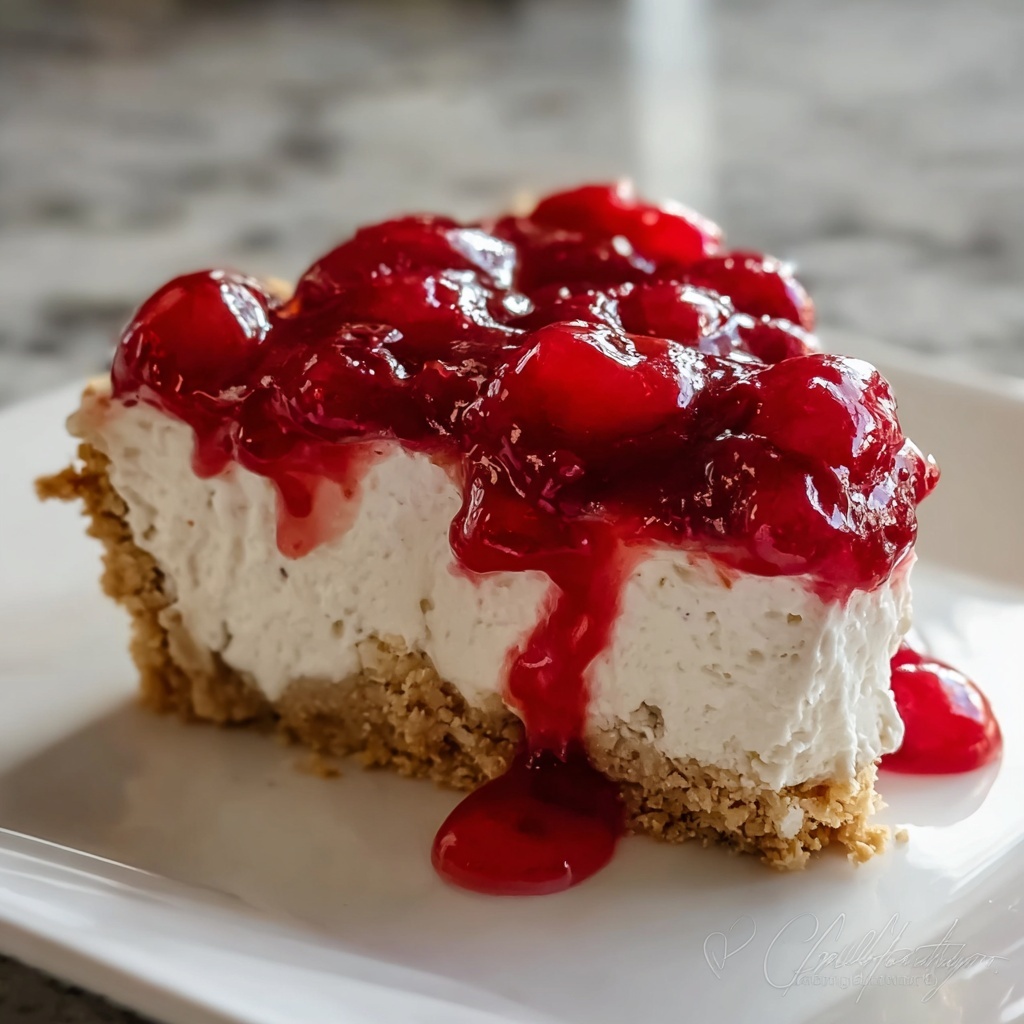
If you’re looking for a dessert that’s both delightful and effortless, this No-Bake Cherry Pie Recipe is an absolute winner. Imagine a buttery graham cracker crust hugging a luxuriously creamy filling, crowned with vibrant, sweet cherry pie filling that bursts with flavor in every bite. It’s the kind of pie that feels indulgent yet light, perfect for warm days or when you want a no-fuss treat that impresses family and friends alike. Trust me, once you try this recipe, it’ll become your go-to for gatherings and cozy nights at home.
Ingredients You’ll Need
The magic behind this No-Bake Cherry Pie Recipe is in its simple, well-chosen ingredients. Each one plays a crucial role in building the perfect balance of texture, sweetness, and fresh cherry flavor. Let’s take a look at what you’ll need to create this show-stopping dessert.
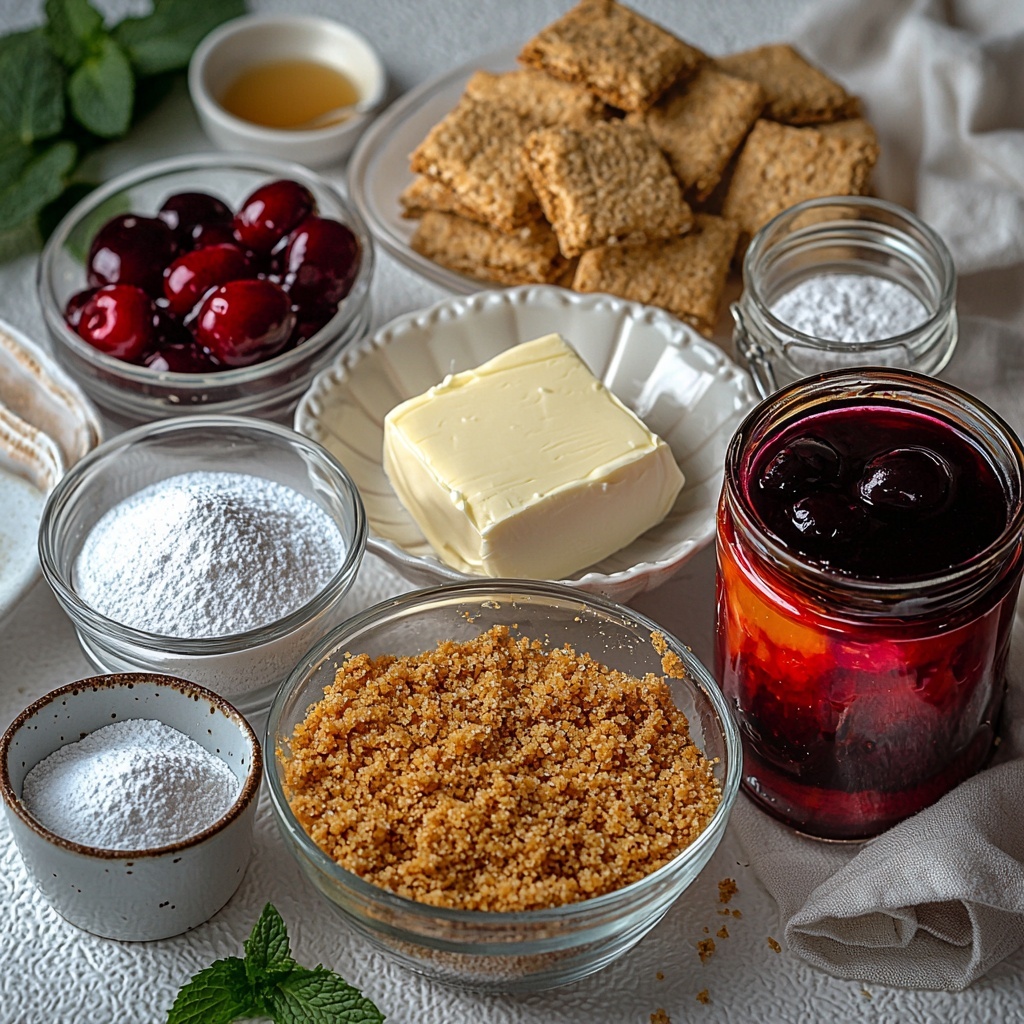
- Graham cracker crumbs: 1 ½ cups provides that crunchy, buttery base that sets the stage for the creamy filling.
- Granulated sugar: ¼ cup adds just the right touch of sweetness to the crust without overpowering it.
- Unsalted butter: ½ cup, melted, to bind the crust ingredients and create that perfect crisp texture.
- Cream cheese: 8 oz, softened, gives the filling its rich, smooth body and mild tanginess.
- Powdered sugar: 1 cup gently sweetens the cream cheese filling for a silky finish.
- Heavy whipping cream: 1 cup whips up light and fluffy, lending volume and softness to the filling.
- Vanilla extract: 1 teaspoon enhances all the flavors with warm, aromatic notes.
- Cherry pie filling: 1 can (about 21 oz), delivers that iconic glossy red topping bursting with juicy cherries.
How to Make No-Bake Cherry Pie Recipe
Step 1: Prepare the Crust
Start by mixing your graham cracker crumbs with the granulated sugar. Pour in the melted unsalted butter and stir until everything looks like wet sand. Press this mixture firmly into the bottom and up the sides of your pie dish. This crust is the foundation—make sure it’s even and compact so it holds together beautifully once chilled.
Step 2: Make the Cream Cheese Filling
Next, beat the softened cream cheese until it’s smooth and creamy. Slowly add in the powdered sugar, keeping the mix light and lump-free. This step is key because a silky filling makes the pie feel luxurious with every spoonful.
Step 3: Whip the Cream
In a separate bowl, whip the heavy cream together with the vanilla extract until you see stiff peaks form. This fluffy cream folds into the cream cheese mixture to lighten it up and add a dreamy texture. Be gentle when folding so the filling stays airy and inviting.
Step 4: Assemble the Pie
Spread the luscious cream cheese filling evenly over the chilled graham cracker crust. Then spoon the cherry pie filling over the top, letting that classic bright red cascade over the creamy layer. It’s starting to look like a masterpiece now!
Step 5: Chill and Set
Place the pie in the refrigerator for at least 4 hours, or even better overnight. This rest time lets the crust firm up and the flavors meld together, creating a pie that slices clean and tastes like summer in every bite.
How to Serve No-Bake Cherry Pie Recipe
Garnishes
For an extra touch of elegance and flavor, top your pie with a sprinkle of toasted sliced almonds or a few fresh cherries. A delicate dusting of powdered sugar or a swirl of whipped cream also adds a lovely finishing flourish that makes the pie look as good as it tastes.
Side Dishes
This pie pairs beautifully with a scoop of vanilla ice cream or a dollop of lightly sweetened whipped cream. For drinks, think iced coffee, sparkling water with a hint of lemon, or even a light rosé to complement the cherry sweetness and creamy filling.
Creative Ways to Present
Want to impress your guests? Serve the pie in elegant clear glass dishes to showcase those stunning cherry layers. You can also create mini individual pies using small mason jars or tart pans, perfect for parties or gifting. These no-bake wonders are versatile and fun to personalize!
Make Ahead and Storage
Storing Leftovers
If you have any pie left over (and I hope you do!), cover it tightly with plastic wrap or foil and keep it refrigerated. The pie will stay fresh and delicious for up to 3 days, making it a perfect make-ahead dessert for busy weeks.
Freezing
This No-Bake Cherry Pie Recipe can be frozen, but for best texture, freeze without the cherry topping and add it fresh after thawing. Wrap the pie well in plastic wrap and aluminum foil, then freeze for up to 1 month.
Reheating
Since this pie is best enjoyed chilled, it doesn’t require reheating. Simply thaw frozen pie in the refrigerator overnight before serving, then add your cherry pie filling on top to keep it fresh and vibrant.
FAQs
Can I use fresh cherries instead of canned cherry pie filling?
Absolutely! If you have fresh cherries, cook them down with a bit of sugar and lemon juice to create your own cherry topping. Just let it cool completely before adding to your pie for the best results.
What can I use if I don’t have graham crackers?
Digestive biscuits or any lightly sweetened, crunchy cookies can be substituted for graham crackers in the crust. Just crush them finely and follow the same mixing method with sugar and butter.
Is it possible to make this recipe dairy-free?
Yes! Use dairy-free cream cheese and a plant-based heavy cream alternative, like coconut cream, whipped until stiff. The flavor and texture will be a bit different but still delicious and creamy.
How long does the pie need to chill?
For the best texture and flavor melding, chilling for at least 4 hours is recommended. Overnight chilling is even better if you have the time—patience really pays off here.
Can I double the recipe for a larger group?
Definitely! Just double each ingredient and use a larger pie dish or two standard-sized dishes. Remember to adjust chilling time slightly if the pie is thicker or in a deeper dish.
Final Thoughts
There’s something truly special about a pie that doesn’t need an oven, yet still delivers that perfect combo of creamy, crunchy, and fruity. This No-Bake Cherry Pie Recipe fits the bill beautifully and makes dessert time easy and joyful. I can’t wait for you to try it and see how it quickly becomes a beloved staple in your recipe collection. Happy pie-making!
Print
No-Bake Cherry Pie Recipe
- Prep Time: 20 minutes
- Cook Time: 0 minutes
- Total Time: 4 hours 20 minutes
- Yield: 8 servings
- Category: Dessert
- Method: No-Cook
- Cuisine: American
Description
This no-bake cherry pie features a crisp graham cracker crust filled with a smooth and creamy cream cheese filling, topped generously with sweet cherry pie filling. It’s a simple, refreshing dessert that requires no baking and is perfect for warm weather or when you want a quick, delicious treat.
Ingredients
Crust
- 1 ½ cups graham cracker crumbs
- ¼ cup granulated sugar
- ½ cup unsalted butter, melted
Filling
- 8 oz cream cheese, softened
- 1 cup powdered sugar
- 1 cup heavy whipping cream
- 1 teaspoon vanilla extract
Topping
- 1 can (about 21 oz) cherry pie filling
Instructions
- Prepare the crust: In a medium bowl, combine the graham cracker crumbs and granulated sugar. Stir in the melted unsalted butter until the mixture resembles wet sand. Press the mixture firmly and evenly into the bottom and up the sides of a pie dish to form the crust.
- Make the cream cheese filling: In a large bowl, beat the softened cream cheese until smooth. Gradually add the powdered sugar and continue beating until the mixture is creamy and well combined.
- Whip the cream: In a separate bowl, whip the heavy whipping cream with the vanilla extract until stiff peaks form. Be careful not to overbeat.
- Fold the mixtures: Gently fold the whipped cream into the cream cheese mixture until fully incorporated and light.
- Assemble the pie: Spread the cream cheese filling evenly into the prepared graham cracker crust. Carefully spoon and spread the cherry pie filling on top of the cream cheese layer for an even topping.
- Chill the pie: Refrigerate the pie for at least 4 hours or preferably overnight to allow the filling to set and the flavors to meld before serving.
Notes
- Make sure the cream cheese is softened to room temperature for a smooth filling.
- For a firmer crust, you can chill the crust in the fridge for 30 minutes before adding the filling.
- This pie is best served chilled and consumed within 2-3 days.
- You can substitute the cherry pie filling with other fruit pie fillings like blueberry or strawberry for variation.

