

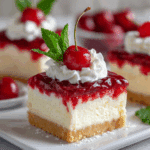
Get ready to fall head over heels for this dreamy Layered Cherry Cheesecake Dessert. It’s the kind of sweet treat that wins hearts at potlucks, holidays, and weeknight dinners alike—effortless to make and absolutely irresistible. With layers of creamy cheesecake filling, buttery graham cracker crust, and a glossy topping of cherry pie filling, it’s the perfect balance of sweet, tangy, and indulgent. Best part? You can whip this up with minimal effort—no baking required!
Why You’ll Love This Recipe
- No-Bake Wonder: Skip the oven! This layered cheesecake is a lifesaver when you want something special without turning on the heat.
- Velvety Texture: That creamy cheesecake layer is so smooth and luscious, it practically melts in your mouth.
- Crowd-Pleaser: It’s got that classic flavor combination—sweet cherries, tangy cream cheese, and buttery crust—that everyone loves.
- Make-Ahead Friendly: Perfect for prepping the night before a gathering so you’re not rushing on the day.
Ingredients You’ll Need

Here’s what you’ll need to bring this dessert to life, plus a few notes to help make it extra delicious:
- Graham crackers: Crushed to form a buttery, crunchy crust. You can also use vanilla wafers or digestive biscuits.
- Butter: Melted and mixed with the crumbs to hold the crust together and add richness.
- Cream cheese: The star of the show! Make sure it’s softened so it blends smoothly.
- Powdered sugar: Sweetens the cheesecake layer without making it grainy.
- Whipped topping: Folded into the cream cheese to lighten the texture. You can use store-bought or homemade.
- Vanilla extract: Just a splash adds depth and warmth to the creamy layer.
- Cherry pie filling: Adds a glossy, fruity topping that contrasts beautifully with the creamy middle. Feel free to use homemade if you prefer.
Variations
Want to switch things up? Try one of these tasty twists:
- Berry Swap: Substitute cherry pie filling with blueberry, raspberry, or mixed berry for a different fruit flavor.
- Chocolate Crust: Use crushed chocolate cookies (like Oreos) instead of graham crackers for a richer, chocolaty base.
- Nutty Crunch: Add chopped pecans or walnuts to the crust mixture for added texture.
- Mini Cheesecakes: Layer the dessert in individual jars or cups for a cute single-serve option—great for parties!
How to Make Layered Cherry Cheesecake Dessert
Step 1: Make the Crust
Start by combining crushed graham crackers with melted butter. Press the mixture into the bottom of a 9×13-inch dish to form a firm, even crust. Pop it in the fridge while you prep the next layer.
Step 2: Prepare the Cheesecake Filling
In a large bowl, beat the softened cream cheese with powdered sugar and vanilla extract until silky smooth. Gently fold in the whipped topping until fully incorporated—this makes the filling airy and light.
Step 3: Layer the Filling
Spread the cream cheese mixture evenly over the chilled crust. Use a spatula to smooth the top for a nice even layer.
Step 4: Add the Cherry Topping
Spoon the cherry pie filling evenly over the cheesecake layer. Be generous! That vibrant red topping is what makes this dessert so striking and flavorful.
Step 5: Chill Before Serving
Refrigerate for at least 4 hours, or overnight if possible. This helps the layers set and makes slicing easier.
Pro Tips for Making the Recipe
- Use Room Temperature Cream Cheese: This makes it easier to blend and results in a smoother filling.
- Chill the Crust: Give the crust a head start by chilling it while preparing the filling—it helps it hold together better when slicing.
- Don’t Rush the Chill Time: Let the dessert set for several hours, or overnight, for the cleanest slices and best texture.
- Use a Hot Knife to Slice: Dip your knife in hot water and wipe clean between cuts to get those picture-perfect layers.
How to Serve
This dessert is a showstopper all on its own, but you can always elevate it a bit more:
Garnish Ideas:
- A dollop of whipped cream
- Shaved chocolate or chocolate drizzle
- Crushed graham crackers or toasted almonds
Pairing Suggestions:
- Serve with coffee or espresso for a cozy dessert experience.
- Add a scoop of vanilla ice cream if you’re feeling extra indulgent.
- Perfect ending to a BBQ or summer potluck when served chilled.
Make Ahead and Storage
Storing Leftovers
Keep leftovers covered in the fridge for up to 5 days. The crust may soften slightly over time, but it’ll still taste amazing.
Freezing
You can freeze this dessert! Wrap it tightly and store for up to 1 month. Thaw in the refrigerator overnight before serving.
Reheating
No reheating necessary—this dessert is best served cold, straight from the fridge.
FAQs
Can I use fresh cherries instead of cherry pie filling?
Yes! Just make a quick compote by simmering fresh pitted cherries with sugar and a splash of lemon juice until thickened. Let it cool completely before layering.
Can I make this dessert gluten-free?
Absolutely. Just use gluten-free graham crackers or cookies for the crust and double-check your other ingredients.
What can I use instead of whipped topping?
You can use homemade whipped cream, but be sure to whip it until stiff peaks form so it holds up well in the dessert.
How do I prevent the crust from falling apart?
Make sure the butter is well-distributed in the crumbs and press the crust down firmly into the dish. Letting it chill before adding the filling also helps it stay intact.
Final Thoughts
This Layered Cherry Cheesecake Dessert is proof that something truly delicious doesn’t have to be complicated. It’s rich, creamy, fruity, and downright gorgeous—perfect for any occasion or no occasion at all. Try it once, and it just might become your go-to dessert when you want to impress with minimal effort. Happy layering!
PrintLayered Cherry Cheesecake Dessert Recipe
A delightful no-bake layered cherry cheesecake dessert with a buttery graham cracker crust, creamy cheesecake filling, and a sweet cherry topping—perfect for potlucks or holiday gatherings.
- Prep Time: 20 minutes
- Cook Time: 0 minutes
- Total Time: 4 hours 20 minutes (including chill time)
- Yield: 12 servings 1x
- Category: Dessert
- Method: No-Bake
- Cuisine: American
- Diet: Vegetarian
Ingredients
- 2 cups graham cracker crumbs
- 1/2 cup unsalted butter, melted
- 2 tablespoons granulated sugar
- 2 (8 oz) packages cream cheese, softened
- 1 cup powdered sugar
- 1 teaspoon vanilla extract
- 1 (8 oz) tub whipped topping (like Cool Whip), thawed
- 1 (21 oz) can cherry pie filling
Instructions
- In a medium bowl, mix graham cracker crumbs, melted butter, and granulated sugar until well combined. Press mixture firmly into the bottom of a 9×13 inch baking dish to form the crust. Chill for 15 minutes.
- In a large mixing bowl, beat the cream cheese until smooth. Add powdered sugar and vanilla extract, and beat until fully incorporated.
- Fold in the whipped topping until mixture is smooth and fluffy.
- Spread the cream cheese mixture evenly over the chilled crust.
- Top with the cherry pie filling, spreading it out evenly.
- Chill the dessert in the refrigerator for at least 4 hours or until set.
- Serve chilled and enjoy!
Notes
- Make sure cream cheese is softened to avoid lumps in the filling.
- Can substitute cherry topping with blueberry or strawberry pie filling.
- For a firmer crust, bake it at 350°F for 8 minutes and let cool before adding filling.
Nutrition
- Serving Size: 1 slice
- Calories: 310
- Sugar: 22g
- Sodium: 240mg
- Fat: 19g
- Saturated Fat: 11g
- Unsaturated Fat: 6g
- Trans Fat: 0g
- Carbohydrates: 31g
- Fiber: 1g
- Protein: 3g
- Cholesterol: 45mg