
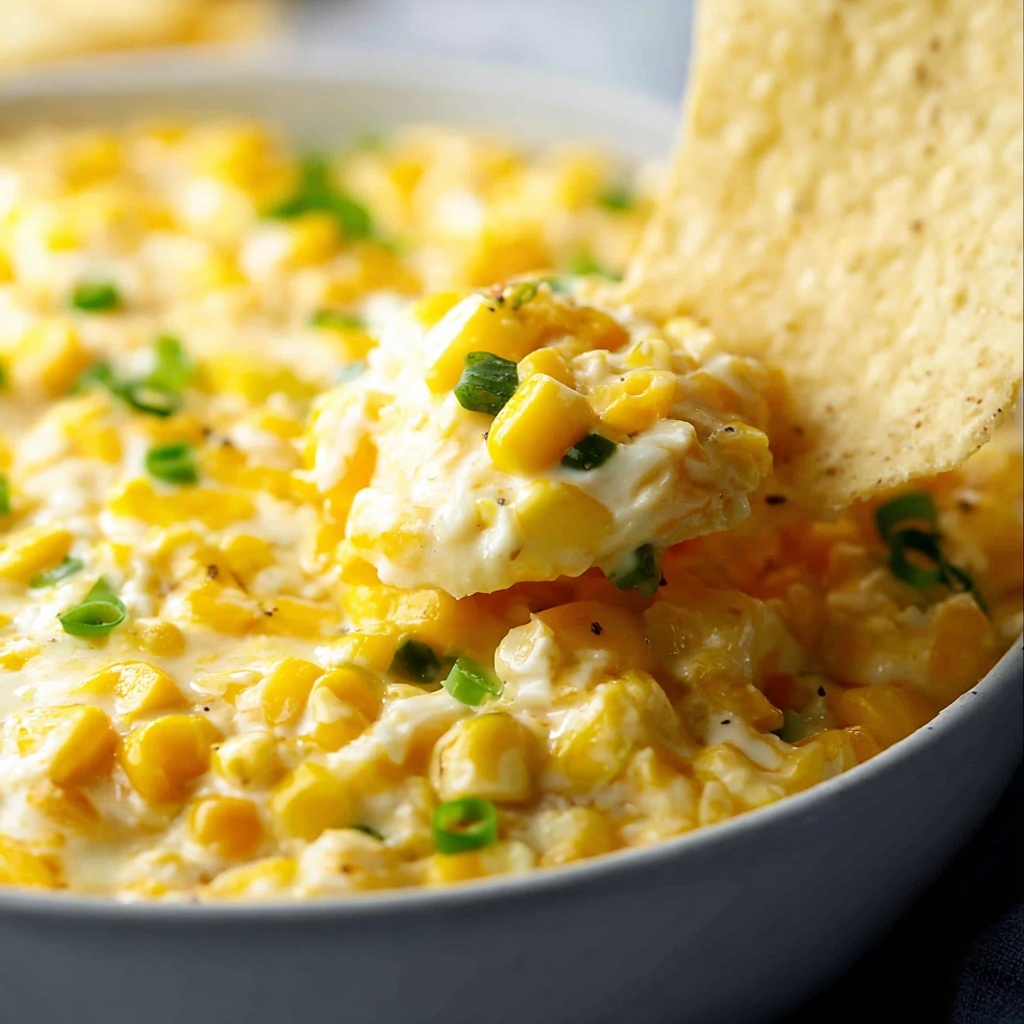
If you’re searching for a comforting, crowd-pleasing snack that brings together a perfect blend of creaminess, spice, and sweetness, this Hot Corn Dip Recipe is exactly what you need. This dish masterfully combines tender sautéed vegetables, sweet corn, and melty cheese into a bubbly, golden dip that’s simply irresistible. Whether you’re entertaining friends, hosting a game day gathering, or craving a cozy treat, this Hot Corn Dip Recipe guarantees delightful flavor and texture in every scoop.
Ingredients You’ll Need
The magic of this Hot Corn Dip Recipe lies in its simple, wholesome ingredients that each play a vital role in creating a vibrant, flavorful dish. These components bring together layers of sweetness, creaminess, gentle heat, and cheesy goodness, making it a harmonious snack everyone will love.
- Olive oil: Perfect for sautéing vegetables to enhance their natural sweetness and soften their texture.
- Onion, diced: Adds a subtle sharpness and depth to the dip’s flavor base.
- Red bell pepper, diced: Brings a bright, sweet crunch and beautiful color contrast.
- Jalapeño, seeds removed and diced: Adds a gentle kick of heat without overwhelming the dish.
- Canned corn, drained: The star ingredient, providing natural sweetness and a pleasing pop in every bite.
- Cream cheese, softened: Creates the rich, creamy texture that holds the dip together.
- Sour cream: Adds tanginess and smoothness to balance the spices.
- Colby Jack cheese, shredded and divided: Melts beautifully, giving the dip its indulgent cheesy top and luscious interior.
- Chili powder: Introduces smoky warmth that complements the sweetness of the corn perfectly.
- Garlic powder: Enhances the savory dimension without overpowering the other flavors.
- Paprika: Adds subtle earthy notes and vibrant color.
- Salt and pepper: Essential for balancing and highlighting all the flavors.
- Sliced green onion, for garnish: Offers a fresh, crisp bite and a lovely pop of green at the end.
How to Make Hot Corn Dip Recipe
Step 1: Sauté the Vegetables
Start by heating the olive oil in a saucepan over medium-high heat. Toss in the diced onion, red bell pepper, and jalapeño, cooking them until they soften and their natural sweetness unfolds. This step layers your dip with aromatic flavors and ensures the vegetables will blend seamlessly with the creamy ingredients.
Step 2: Preheat the Oven
While your veggies are sautéing, set your oven to 400°F (200°C) so it’s perfectly heated when you’re ready to bake the dip. This step ensures a beautifully golden and bubbly finish.
Step 3: Mix All Ingredients
In a large bowl, combine the sautéed vegetables with the drained corn, softened cream cheese, sour cream, and half of the shredded Colby Jack cheese. Sprinkle in the chili powder, garlic powder, paprika, salt, and pepper. Stir everything together until it’s wonderfully uniform, creamy, and bursting with vibrant flavors just waiting to be baked.
Step 4: Bake Your Dip
Transfer the mixture into a 2-quart casserole dish or a small oven-proof skillet, spreading it evenly. Sprinkle the remaining shredded cheese across the top to create a luscious, cheesy crust. Bake for 15 to 20 minutes, or until the dip is hot, bubbly, and the top turns a delightful golden brown. This bubbling, cheesy finish is the hallmark of a great Hot Corn Dip Recipe.
Step 5: Garnish and Serve
Once baked, let the dip cool for just a bit before scattering sliced green onions on top. These fresh garnishes add a light crunch and a fresh burst of color, making every bite irresistibly vibrant and satisfying.
How to Serve Hot Corn Dip Recipe

Garnishes
Green onions are a classic choice to top off the dip, providing a touch of brightness that contrasts perfectly with the rich, creamy layers. If you’re feeling adventurous, a sprinkle of fresh cilantro or a few thin slices of jalapeño can also add visual appeal and a bit of extra zing.
Side Dishes
Hot Corn Dip Recipe pairs wonderfully with crunchy tortilla chips or sturdy crackers that can handle the creamy texture without breaking. You can also serve it alongside fresh veggie sticks like carrot, celery, or cucumber to add a refreshing bite and some balance to the richness.
Creative Ways to Present
For an eye-catching presentation, serve the hot corn dip in a hollowed-out bread bowl or individual mini skillets for personal servings. This not only looks lovely but also keeps the dip warm longer. Alternatively, layer it in clear glass dishes to showcase its vibrant colors before baking — a guaranteed conversation starter!
Make Ahead and Storage
Storing Leftovers
If you happen to have any leftovers (which might be rare because this dip disappears fast), simply transfer them to an airtight container and refrigerate for up to 3 days. The flavors will meld more, making reheated servings just as delicious as the first.
Freezing
Freezing hot corn dip is possible but not always ideal because the texture of dairy can change. However, if you want to prepare it ahead of time, freeze the dip in an airtight container for up to 1 month. Thaw it overnight in the refrigerator before reheating gently in the oven.
Reheating
To bring leftovers back to life, reheat the dip in an oven-safe dish at 350°F (175°C) for 15 to 20 minutes or until warmed through and bubbly. Avoid microwave reheating if possible, as it tends to make the cheese tough and stringy rather than creamy and smooth.
FAQs
Can I make this Hot Corn Dip Recipe vegetarian or vegan?
Absolutely! To keep it vegetarian, stick with the recipe as is, ensuring your cheeses are made with vegetarian rennet. For a vegan version, substitute cream cheese and sour cream with plant-based alternatives, and use vegan cheese. The flavors will still shine beautifully.
Is it possible to use fresh corn instead of canned?
Yes! Fresh corn gives a slightly sweeter and more vibrant taste. Simply cut the kernels off 3-4 ears of corn and sauté with the vegetables. You might want to adjust cooking time just slightly to soften the corn if needed.
How spicy is this dip? Can I adjust the heat?
This Hot Corn Dip Recipe has a mild kick from the jalapeño and chili powder, making it pleasant for most palates. You can dial up the heat by adding more jalapeño or a pinch of cayenne pepper, or tone it down by removing the seeds entirely or leaving out the jalapeño.
Can I prepare this dip ahead and bake it just before serving?
Definitely. You can mix all the ingredients and keep the dip covered in the fridge for up to 24 hours. When ready to serve, sprinkle the remaining cheese on top and bake it fresh to get that perfect bubbling crust.
What are good alternatives to Colby Jack cheese?
Cheddar, Monterey Jack, or a blend of mozzarella and pepper jack work perfectly if you want to switch things up. These cheeses melt well and offer complementary flavors with nice gooey textures.
Final Thoughts
Trust me, once you try this Hot Corn Dip Recipe, it will quickly become one of your go-to dishes for any occasion that calls for delicious, comforting snacking. It’s easy to make, endlessly versatile, and a guaranteed hit with friends and family. So grab your skillet, gather these simple ingredients, and prepare to indulge in a dip that’s pure joy in every bite.
Print
Hot Corn Dip Recipe
- Prep Time: 10 minutes
- Cook Time: 20 minutes
- Total Time: 30 minutes
- Yield: 8 servings
- Category: Appetizer
- Method: Baking
- Cuisine: American
- Diet: Vegetarian
Description
This Hot Corn Dip is a warm, cheesy appetizer featuring sautéed vegetables and corn, combined with cream cheese and spices, then baked until bubbly and golden. Perfect for parties and gatherings, it’s easy to prepare and served best with tortilla chips or crackers.
Ingredients
Vegetables and Aromatics
- 1 tablespoon olive oil
- 1/2 onion, diced
- 1 red bell pepper, diced
- 1 jalapeño, seeds removed and diced
Main Ingredients
- 2 (15-ounce) cans corn, drained
- 8 ounces cream cheese, softened
- 1/2 cup sour cream
- 2 cups Colby Jack cheese, shredded and divided
Seasonings
- 1/2 teaspoon chili powder
- 1/2 teaspoon garlic powder
- 1/4 teaspoon paprika
- Salt and pepper, to taste
Garnish
- Sliced green onion, for garnish
Instructions
- Sauté vegetables: Heat olive oil in a saucepan over medium-high heat. Add diced onion, red bell pepper, and jalapeño, and sauté until the vegetables are tender and fragrant, about 5-7 minutes.
- Combine ingredients: In a mixing bowl, add the sautéed vegetables, drained corn, softened cream cheese, sour cream, 1 cup of shredded Colby Jack cheese, chili powder, garlic powder, paprika, salt, and pepper. Stir thoroughly until all the ingredients are evenly combined into a creamy mixture.
- Prepare for baking: Preheat the oven to 400°F (200°C). Spread the prepared corn mixture evenly into a 2-quart casserole dish or an oven-safe small skillet. Evenly sprinkle the remaining 1 cup of shredded Colby Jack cheese over the top.
- Bake: Place the casserole dish or skillet in the preheated oven and bake for 15-20 minutes, or until the dip is hot throughout, bubbly, and the cheese on top is melted and golden brown.
- Serve: Remove from the oven and garnish with sliced green onions. Serve the dip hot with tortilla chips or crackers for dipping and enjoy immediately.
Notes
- You can adjust the spiciness by adding more or less jalapeño depending on your preference.
- The dip can be prepared ahead of time and assembled before baking; just cover and refrigerate until ready to bake.
- For a smoother consistency, you can blend the mixture before baking.
- Vegetarian-friendly, but not vegan due to dairy ingredients.
- Leftovers can be stored in an airtight container in the refrigerator for up to 3 days and reheated before serving.


