“`html
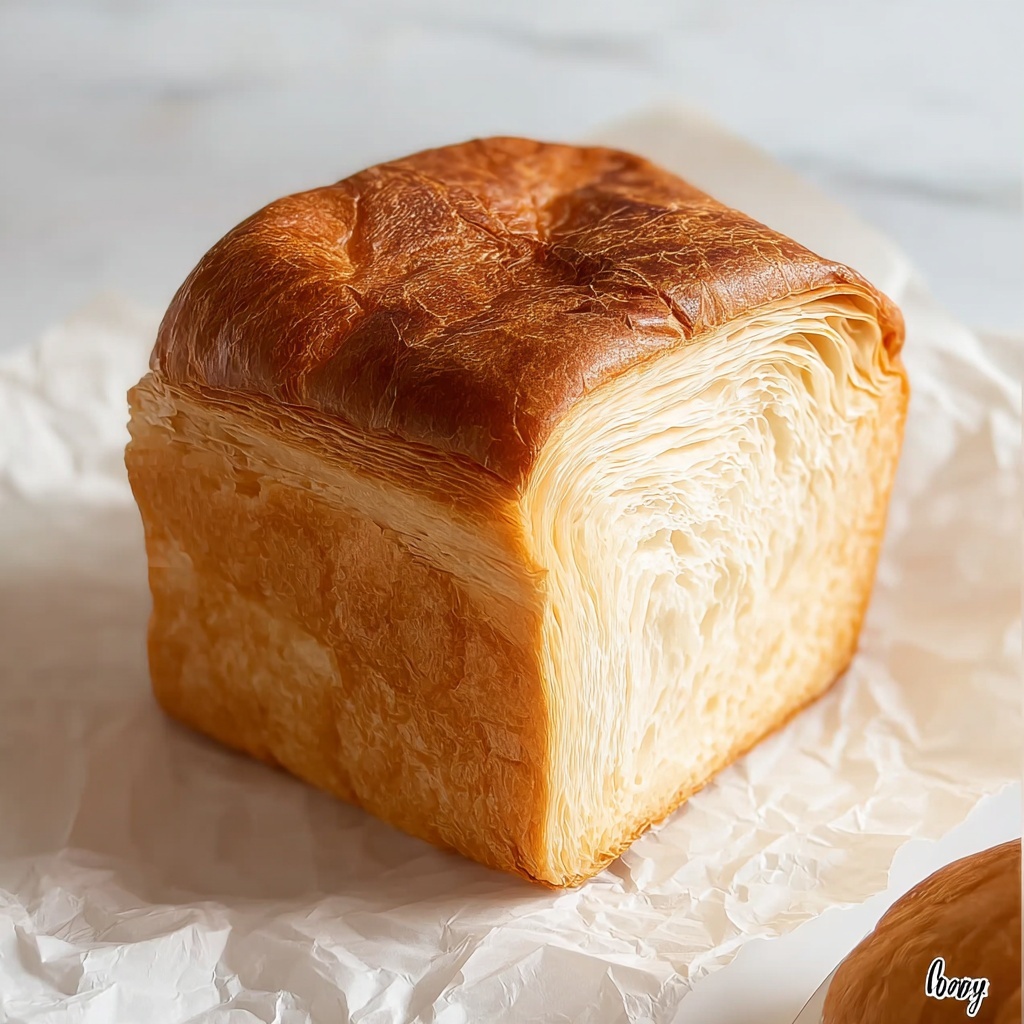
If you’ve ever dreamed of creating that magical, melt-in-your-mouth bread with layers so delicate they practically dissolve on your tongue, you’re in for a treat. Flaky Tissue Bread: The Homemade Delight You’ll Crave Recipe brings together simple pantry staples into a stunning, flaky masterpiece that makes every bite utterly irresistible. This bread isn’t just food—it’s an experience, with its golden crust and airy, buttery layers promising a homemade delight that’s absolutely worth every step in the kitchen. Once you try this Flaky Tissue Bread: The Homemade Delight You’ll Crave Recipe, I promise you’ll want to bake it again and again.
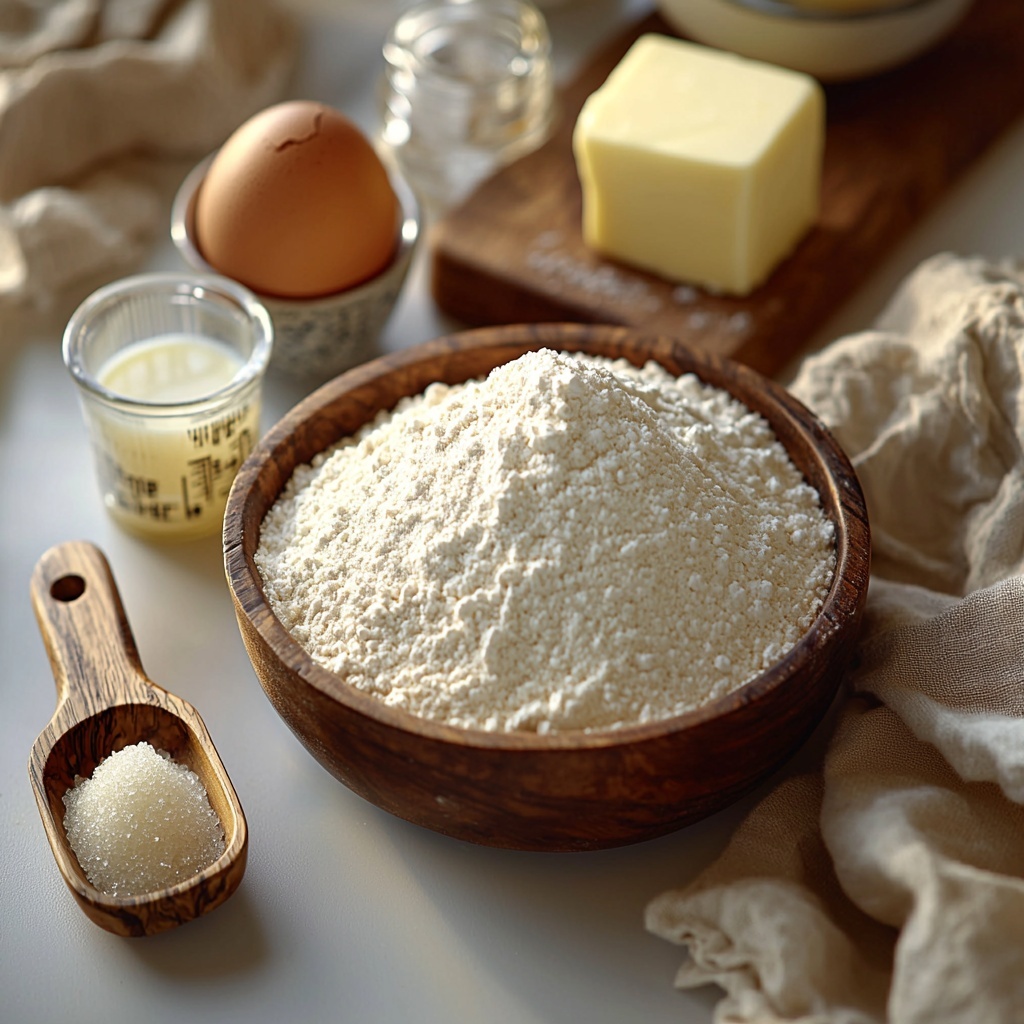
Ingredients You’ll Need
The magic behind Flaky Tissue Bread: The Homemade Delight You’ll Crave Recipe is in how basic ingredients come together to create something extraordinary. Each one plays a vital role, from the flour that builds structure to the butter that layers in that signature flakiness.
- 500 g all-purpose flour: Provides a perfect base for a fluffy texture, essential for the bread’s tender crumb.
- 2 tbsp sugar: Balances the flavors and helps develop a beautiful golden crust during baking.
- 1 tsp salt: Enhances overall flavor, ensuring every layer tastes just right.
- 1 tbsp instant yeast: This is the key to a wonderful rise, making the dough light and airy.
- 250 ml warm milk: Activates the yeast while adding a subtle creaminess.
- 1 whole egg: Gives structure and moisture, binding the dough perfectly.
- 60 g butter, melted: Adds richness and softness to the dough itself.
- 200 g butter, softened: Essential for the flaky texture by forming layers within the dough.
How to Make Flaky Tissue Bread: The Homemade Delight You’ll Crave Recipe
Step 1: Activate the Yeast and Prepare the Dough
Start by mixing the warm milk, sugar, and instant yeast in a small bowl. Stir gently and let it sit for 5 to 10 minutes until it becomes frothy. This is your signal that the yeast is alive and ready to work its magic. Meanwhile, combine the flour, salt, egg, melted butter, and yeast mixture in a large bowl. Knead by hand or with a mixer for about 10 minutes until the dough is smooth and elastic. This kneading step is crucial to develop the gluten that will give your bread strength and softness.
Step 2: Let the Dough Rise
Cover the dough with a damp cloth and allow it to rest in a warm spot for about an hour, until it doubles in size. This leisurely rise helps to build flavor and lightness, setting the stage for those wonderful layers.
Step 3: Shape and Layer the Dough
After the dough has risen, gently punch it down to release excess air. Divide it into 8 equal pieces and roll each piece into a ball. Roll out each ball into a thin sheet, then generously spread softened butter on top. Carefully stack the sheets one atop the other, spreading butter between each layer. This butter layering is what creates the iconic flakiness of the bread.
Step 4: Form the Dough Layers
Once stacked, roll the dough stack into a log shape, pressing gently with a rolling pin to flatten slightly. Fold this flattened log like a business letter and let it rest for 10 minutes. Resting relaxes the gluten and keeps the dough tender and easy to work with in the next steps.
Step 5: Final Rolling and Proofing
After resting, roll the dough out into a thin sheet again, then fold it once more before shaping it into a log. Place the log into a greased baking pan, brush the top with egg wash for a luscious shine, and let it proof for 30 minutes. This final rise ensures a beautiful puff during baking.
Step 6: Bake to Perfection
Preheat your oven to 180°C (350°F). Bake the bread for 20 to 25 minutes until it turns a golden brown and smells heavenly. The moment you pull it out, your kitchen will be filled with that irresistible aroma that only freshly baked Flaky Tissue Bread can provide.
How to Serve Flaky Tissue Bread: The Homemade Delight You’ll Crave Recipe
Garnishes
This bread’s buttery layers speak for themselves, but a light sprinkle of sea salt or a brush of melted butter right after baking elevates its flavor even more. For special occasions, scatter some toasted sesame or poppy seeds on top before baking for a subtle crunch and visual appeal.
Side Dishes
Flaky Tissue Bread is a versatile companion. It pairs beautifully with hearty soups, creamy dips like spinach-artichoke or hummus, and even sweet spreads like honey or homemade jam. Its airy quality makes it perfect for soaking up sauces or simply enjoying on its own.
Creative Ways to Present
Serve your Flaky Tissue Bread sliced into thin half-moons or thick slabs for dipping and dunking. Arrange the pieces in a basket lined with a linen cloth for a rustic, inviting touch. For brunch or a party, slice it and spread with flavored butter or cheese spreads to create irresistible open-faced sandwiches.
Make Ahead and Storage
Storing Leftovers
If you have any leftovers (which might be rare given how good this bread is), store them in an airtight container or wrapped tightly in plastic wrap. This keeps the bread moist and prevents it from drying out, maintaining that soft, flaky texture for up to two days.
Freezing
You can freeze Flaky Tissue Bread by wrapping it well in plastic wrap and then placing it in a freezer bag. Freeze up to a month for optimal freshness. When you’re ready to enjoy it, thaw it slowly at room temperature for the best texture.
Reheating
To revive the freshness of your bread, warm it in a preheated oven at 160°C (320°F) for about 5 to 10 minutes. This quick reheating refreshes the flakes and brings back that irresistible buttery aroma, as if it were just baked.
FAQs
Can I use bread flour instead of all-purpose flour?
Yes, bread flour can be used to give the bread a bit more chew and elasticity, but all-purpose flour works perfectly fine for Flaky Tissue Bread: The Homemade Delight You’ll Crave Recipe, delivering a soft and tender crumb.
Why do I need to let the dough rest multiple times?
Resting between folds relaxes the gluten, which prevents the dough from becoming tough and helps create those delicate, flaky layers that make this bread so special.
Can I substitute the milk with water?
While you can use water, milk adds richness and helps the yeast activate more effectively, contributing to a softer crumb and improved flavor.
Is it necessary to use softened butter between the layers?
Yes, softened butter is key to creating the flaky layers. Cold butter won’t spread evenly, and melted butter will soak into the dough, losing that layered effect.
How do I know when the bread is fully baked?
The bread should be golden brown on top and sound hollow when tapped on the bottom. Additionally, it will pull away slightly from the pan edges, signaling it’s ready to come out of the oven.
Final Thoughts
There’s something truly special about making Flaky Tissue Bread: The Homemade Delight You’ll Crave Recipe from scratch. The process might take some time, but the reward is a stunning, flaky loaf that tastes like pure love baked into every layer. I encourage you to dive into this recipe and treat yourself and your loved ones to a homemade delight that everyone will rave about. Trust me, once you do, this bread will become a cherished staple in your kitchen.
“`
Print
Flaky Tissue Bread: The Homemade Delight You’ll Crave Recipe
- Prep Time: 20 minutes
- Cook Time: 25 minutes
- Total Time: 1 hour 45 minutes
- Yield: 8 servings
- Category: Bread
- Method: Baking
- Cuisine: Western
- Diet: Vegetarian
Description
Flaky Tissue Bread is a delightful homemade bread known for its beautifully layered, flaky texture and soft, buttery flavor. This recipe takes you through a careful combination of kneading, layering with butter, and folding to create a bread that’s crispy on the outside and light as tissue on the inside. Perfect for serving with breakfast or as a snack, it offers a satisfying treat that’s simple to make with common ingredients.
Ingredients
Dough Ingredients
- 500 g all-purpose flour
- 2 tbsp sugar
- 1 tsp salt
- 1 tbsp instant yeast
- 250 ml warm milk
- 1 whole egg
- 60 g butter, melted
Layering Butter
- 200 g butter, softened
Instructions
- Activate Yeast: In a small bowl, combine warm milk, sugar, and instant yeast. Stir gently and let sit for 5-10 minutes until the mixture becomes frothy, indicating the yeast is active.
- Prepare Dough: In a large mixing bowl, mix the all-purpose flour, salt, egg, melted butter, and the activated yeast mixture. Knead the dough for about 10 minutes until it turns smooth and elastic, which helps develop the gluten structure for a good rise.
- First Proof: Cover the dough with a damp cloth and let it rest for 1 hour or until it doubles in size, allowing the yeast to ferment and the dough to rise well.
- Divide and Roll: Punch down the risen dough to release air, divide it into 8 equal pieces, and roll each piece into a ball to prepare for layering.
- Create Layers: Roll each dough ball into a thin sheet, then spread a generous amount of softened butter over the surface. Stack the buttered sheets on top of each other, buttering each layer thoroughly to achieve flaky layers in the final bread.
- Form Log and Fold: Roll the stacked sheets into a log gently flattening it with a rolling pin, then fold the dough like a business letter to create defined layers. Let it rest for 10 minutes to relax the gluten.
- Second Fold and Shape: After resting, roll the dough into a thin sheet again, fold it once more, and shape it back into a log. Place the shaped dough in a greased pan for final proofing.
- Final Proof: Brush the top of the dough with egg wash for a shiny golden crust and let it proof for 30 minutes, allowing the dough to rise again before baking.
- Bake: Preheat the oven to 180°C (350°F) and bake the bread for 20-25 minutes until the crust turns golden brown and crispy. Remove from the oven and cool slightly before slicing and serving.
Notes
- Use softened butter for layering to ensure easy spreading and distinct flaky layers.
- Maintaining the dough temperature and handling it gently during layering is key to achieving the best flaky texture.
- Egg wash can be substituted with milk for a less shiny but still golden crust.
- Ensure the yeast mixture is frothy before mixing to confirm yeast is active.
- Allow the bread to cool before slicing to prevent crumbling.


