

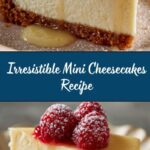
If you’re looking for a crowd-pleasing, bite-sized treat that packs all the rich, creamy decadence of a full-sized cheesecake, these Mini Cheesecakes are sure to steal the show at any gathering. With their buttery graham cracker crust, velvety filling, and endless options for toppings, each one delivers the perfect balance of sweet, tangy, and just a little indulgent. Whether you’re hosting a party or just want to make an ordinary weeknight feel special, these easy, adorable desserts are always met with oohs, aahs, and clean plates. Plus, Mini Cheesecakes are wonderfully simple to make—even if you’re just starting out in the kitchen, you’ll love how fuss-free and fun this recipe is!

Ingredients You’ll Need
One of the reasons I love Mini Cheesecakes so much is because the ingredient list is short and sweet, but every item plays a starring role. Each element is there to make the flavors pop, the texture just right, and the finished desserts absolutely irresistible—so let’s get started by gathering everything you need!
- Graham cracker crumbs: These create that quintessential buttery, crunchy crust everyone loves at the base of a cheesecake.
- Granulated sugar: Adds balanced sweetness to the crust and the creamy filling, making every bite delightful.
- Unsalted butter, melted: Helps bind the crust together and adds a subtle richness that pairs beautifully with the tangy filling.
- Cream cheese, softened: The heart of the filling—make sure it’s fully softened for that perfectly smooth, lump-free texture.
- Large eggs: Give the cheesecakes structure and help achieve that silky, creamy interior.
- Vanilla extract: Infuses the filling with warm, fragrant notes and that classic cheesecake flavor we all adore.
- Sour cream: This secret ingredient adds a gentle tang and makes the filling extra luscious and smooth.
- Optional toppings: Fresh berries, fruit preserves, whipped cream, or chocolate sauce let you personalize your Mini Cheesecakes and make each one unique.
How to Make Mini Cheesecakes
Step 1: Preheat and Prepare Your Pan
Begin by preheating your oven to 325°F (163°C) and lining a standard 12-cup muffin tin with paper liners. The liners not only make the Mini Cheesecakes easy to remove, but also add a charming, bakery-style touch that always earns compliments. This simple preparation ensures your crust holds together and makes serving a breeze.
Step 2: Make the Graham Cracker Crust
In a small bowl, combine your graham cracker crumbs, two tablespoons of sugar, and melted butter. Mix everything together until it resembles damp sand—rich, fragrant, and golden. Spoon about a tablespoon of the mixture into each muffin liner, pressing down firmly with your fingers or the bottom of a small glass to create a compact, even crust. Bake for just 5 minutes to set, then let cool while you prepare the filling. This step is essential for a crust that stays crisp and tasty, never soggy!
Step 3: Creamy Cheesecake Filling
Grab a large mixing bowl and beat the softened cream cheese until it’s completely smooth. You want to ensure there are no lumps, so take your time! Next, add the half cup of granulated sugar, blending until combined. Crack in the eggs one at a time, beating slowly after each addition to keep the mixture creamy. Finally, mix in the vanilla extract and sour cream, blending until smooth—but avoid over-mixing to keep your Mini Cheesecakes light and delicate.
Step 4: Fill and Bake
Divide the creamy cheesecake filling evenly among your 12 muffin cups, using about 2 to 3 tablespoons for each. Gently smooth the tops if needed, then transfer the tin to your preheated oven. Bake for 16 to 18 minutes, or until the centers look set but still show a little jiggle when gently shaken. This ensures your Mini Cheesecakes turn out irresistibly creamy, not dry.
Step 5: Cool and Chill
After baking, let the cheesecakes cool in the pan for 10 minutes so they can set up a bit. Then, carefully move each one to a wire rack to finish cooling completely. For the best texture and flavor, refrigerate the Mini Cheesecakes for at least 2 hours. This chilling time not only helps them firm up, but also allows the flavors to truly bloom. Don’t rush—this is where the magic happens!
How to Serve Mini Cheesecakes

Garnishes
This is where the fun begins—dress up your chilled Mini Cheesecakes with a swirl of freshly whipped cream, a tumble of juicy berries, a drizzle of glossy chocolate sauce, or even your favorite fruit preserves. Each topping adds its own color and character, whether you’re going for elegant or playful. A little garnish goes a long way in making these desserts feel extra special!
Side Dishes
Mini Cheesecakes make a fabulous finish to any meal and pair wonderfully with light, refreshing sides. Consider serving them alongside a fruit salad, lemon sorbet, or a simple platter of fresh seasonal fruits. If you’re hosting a dessert buffet, these minis are perfect next to coffee, tea, or even a sparkling drink to balance their creamy richness.
Creative Ways to Present
To really wow your guests, get creative with how you serve your Mini Cheesecakes! Arrange them on a tiered dessert stand for a stunning centerpiece, or nestle each one in a colorful paper cup matched to your party theme. For birthday parties, let guests pick and customize their own toppings, making it a sweet interactive treat. These little cakes are also delightful tucked into a gift box for a homemade hostess present—guaranteed to brighten anyone’s day!
Make Ahead and Storage
Storing Leftovers
If you’re lucky enough to have leftovers, store your Mini Cheesecakes in an airtight container in the refrigerator. They’ll stay fresh and creamy for up to four days. I love sneaking one as a sweet midday treat—they never lose their texture or flavor!
Freezing
Yes, you can freeze Mini Cheesecakes! Simply place them on a tray and freeze until solid, then wrap each one tightly in plastic wrap and store in a freezer bag. They’ll keep well for up to two months. Just remember to add toppings after thawing, so everything stays fresh and beautiful.
Reheating
Mini Cheesecakes are best enjoyed cold or at room temperature, so there’s really no need to reheat. If you’ve frozen them, simply thaw overnight in the fridge or for a couple of hours on the counter. They’ll taste just as luscious and creamy as freshly made!
FAQs
Can I use a different type Dessert
Absolutely! While graham crackers are classic, you can experiment with Oreos, vanilla wafers, or even gingersnaps to put your own spin on the base of your Mini Cheesecakes.
Are there any ways to make these Mini Cheesecakes ahead for a party?
Yes, Mini Cheesecakes are the ultimate make-ahead dessert. Bake and chill them up to two days in advance, then add your toppings just before serving for the freshest results.
Can I make these gluten-free?
Definitely! Just swap in your favorite gluten-free graham crackers or cookies for the crust, and the rest of the recipe stays the same, so everyone can enjoy.
Why did my cheesecakes crack on top?
This can happen if the batter is overmixed or baked a bit too long. Don’t worry, though—tiny cracks are easy to hide with a dollop of whipped cream or fresh fruit, and the cheesecakes will still taste amazing!
How do I know when my Mini Cheesecakes are done baking?
The centers should look mostly set but still jiggle slightly when you gently shake the pan. That little wiggle means you’ll get cheesecakes that are moist and creamy, never dry.
Final Thoughts
I hope you’ll give these Mini Cheesecakes a try in your own kitchen—you truly can’t beat their irresistible blend of creamy, tangy, and sweet in such a fun, portable package. Whether for a special occasion or just to satisfy your cheesecake cravings, these little gems are guaranteed to make you (and everyone you share them with) smile.
PrintMini Cheesecakes Recipe

These Mini Cheesecakes are a delightful and easy-to-make dessert perfect for any occasion. Creamy, sweet, and perfectly portioned, they are sure to impress your guests.
- Prep Time: 15 minutes
- Cook Time: 18 minutes
- Total Time: 2 hours 33 minutes
- Yield: 12 mini cheesecakes 1x
- Category: Dessert
- Method: Baking
- Cuisine: American
- Diet: Non-Vegetarian
Ingredients
For the crust:
- 1 cup graham cracker crumbs
- 2 tablespoons granulated sugar
- 4 tablespoons unsalted butter, melted
For the filling:
- 16 ounces cream cheese, softened
- 1/2 cup granulated sugar
- 2 large eggs
- 1 teaspoon vanilla extract
- 1/4 cup sour cream
Optional toppings:
- fresh berries
- fruit preserves
- whipped cream
- chocolate sauce
Instructions
- Preheat the oven and prepare the muffin tin: Preheat the oven to 325°F (163°C) and line a 12-cup muffin tin with paper liners.
- Make the crust: In a small bowl, mix graham cracker crumbs, 2 tablespoons sugar, and melted butter. Press mixture into each muffin cup.
- Bake the crusts: Bake for 5 minutes, then cool.
- Prepare the filling: Beat cream cheese until smooth. Add sugar, eggs, vanilla, and sour cream. Mix until smooth.
- Fill the muffin cups: Divide filling among the cups.
- Bake: Bake for 16–18 minutes until set.
- Cool and refrigerate: Cool in the pan, then refrigerate for 2 hours.
- Add toppings and serve: Add desired toppings before serving.
Notes
- Ensure cream cheese is fully softened for best results.
- Mini cheesecakes can be made in advance and stored in the fridge.
- For a gluten-free option, use gluten-free graham crackers.
Nutrition
- Serving Size: 1 mini cheesecake
- Calories: 220
- Sugar: 14g
- Sodium: 160mg
- Fat: 15g
- Saturated Fat: 8g
- Unsaturated Fat: 6g
- Trans Fat: 0g
- Carbohydrates: 17g
- Fiber: 0g
- Protein: 4g
- Cholesterol: 55mg